Preface
Motivation
When I started my journey with TPMs (Trusted Platform Modules), I experienced two conflicting emotions: enthusiasm and confusion. Indeed, the principle of TPM seemed brilliant to me, but I struggled to understand how I could actually put it into practice.
After several months of perseverance, and thanks to the valuable work of the community (i.e. tools, blog posts, etc.), I reached a level of understanding that could be considered acceptable. In hindsight, I can clearly say that my learning cost was too high, but it doesn’t necessarily have to be for everyone.
That is why, I am taking on the challenge of producing a (relatively) comprehensive introduction to the subject. In short, the content I would have dreamed of having when I started this journey.
What’s TPM Pills?
TPM Pills is a direct tribute to Nix Pills, who has helped many people discover the nix language!
A series of articles that gradually introduce the key concepts about a TPM. The goal is that by the end of reading TPM Pills, you will have a solid understanding of the functionalities offered by a TPM in order to reduce the complexity of TPM 2.0 specification1 if you find yourself reading it. Additionally, each article will be accompanied by a reproducible example to make things more concrete.
Note:
TPM Pillswill refer a bunch of time to the TPM 2.0 specification. Knowing that the latter evolves over time, we will use the latest version2 available at the time of writing.The spec is also available here in the repository.
Finally, it is important to emphasize that this content is free.
Who is this for?
To anyone who wants to understand TPM and its functionalities. Whether you are a developer, a security expert, or just curious, you will find something to satisfy your curiosity.
A developer background is recommended especially for the implementation part.
Other educational resources
If you want to explore the topic further or if the TPM Pills approach simply doesn’t suit you, be aware that there are other alternatives:
| Resource | Description | Format |
|---|---|---|
| A Practical Guide to TPM 2.0 | At the time of writing, the most comprehensive book on the subject (my bedside book)! Note: PDF format is free | Book |
| OST2 courses | Note: courses are free | Online course |
| TPM.dev tutorials | To share developer-friendly resources about Trusted Platform Modules (TPM) and hardware security, including other Hardware Security Modules (HSM). Note: description from the repo | Tutorials |
| TPM-JS by Google | TPM-JS lets you experiment with a software TPM device in your browser. It’s an educational tool that teaches you how to use a TPM device to secure your workflows. Note: description from the repo Warning: the repo is archived since 2022 | Tutorials |
| TPMCourse by Nokia | A short course on getting started with understanding how a TPM 2.0 works. In this course we explain a number of the features of the TPM 2.0 through the TPM2_Tools through examples and, optionally, exercises. Note: description from the repo | Tutorials |
Table: Educational Resources
Who Am I?
I’m Loïc Sikidi a passionate software engineer from France. I love to learn and share my (little bit of) knowledge with others.
I’m far from being an expert on the subject, but I want to contribute to the democratization of this technology because I’m convinced that the TPM is a powerful tool that can help us to build more secure systems.
🚧 TPM Pills is in beta 🚧
- if you encounter problems 🙏 please report them on the tpm-pills issue tracker
- if you think that
TPM Pillsshould cover a specific topic which isn’t in the roadmap, let’s initiate a discussion 💬
-
The specification available here is a dense and relatively complex document. ↩
-
Version 184 released on March 2025 ↩
Why TPM is super dope?
Introduction
What is a TPM (Trusted Platform Module)? It’s a secure cryptoprocessor — a piece of hardware — capable of performing cryptographic operations. Like a HSM1, a Smart Card2, or a YubiKey, a TPM must be considered as a secure enclave — a device able to create keys without allowing them to be exported, which is highly beneficial from a security perspective.
Where a TPM shines is in its ubiquity! Indeed, it can be found almost everywhere: PCs, servers, network gear, an increasing number of embedded systems, and even in the cloud. Therefore, it’s very likely that you can already take advantage of it without spending a dime.
For example, if you have developed the bad habit of storing your SSH key pairs in plaintext (i.e.
~/.ssh/), be aware that you can generate them with a TPM to protect yourself from data theft if your filesystem is compromised.TipIf you want to learn how: take a look at ssh-tpm-agent repo and its companion blog post.
This functionality (highly important as it is) is actually just the tip of the iceberg. The TPM standard aims to address a root of trust issue through the principle of Hardware Root of Trust (HRoT). This standard operates on the premise that it is safer to base certain low-level functions on hardware rather than software.
For example, this concept can be applied during a machine’s boot process, where measurements are transmitted to the TPM to verify its integrity3.
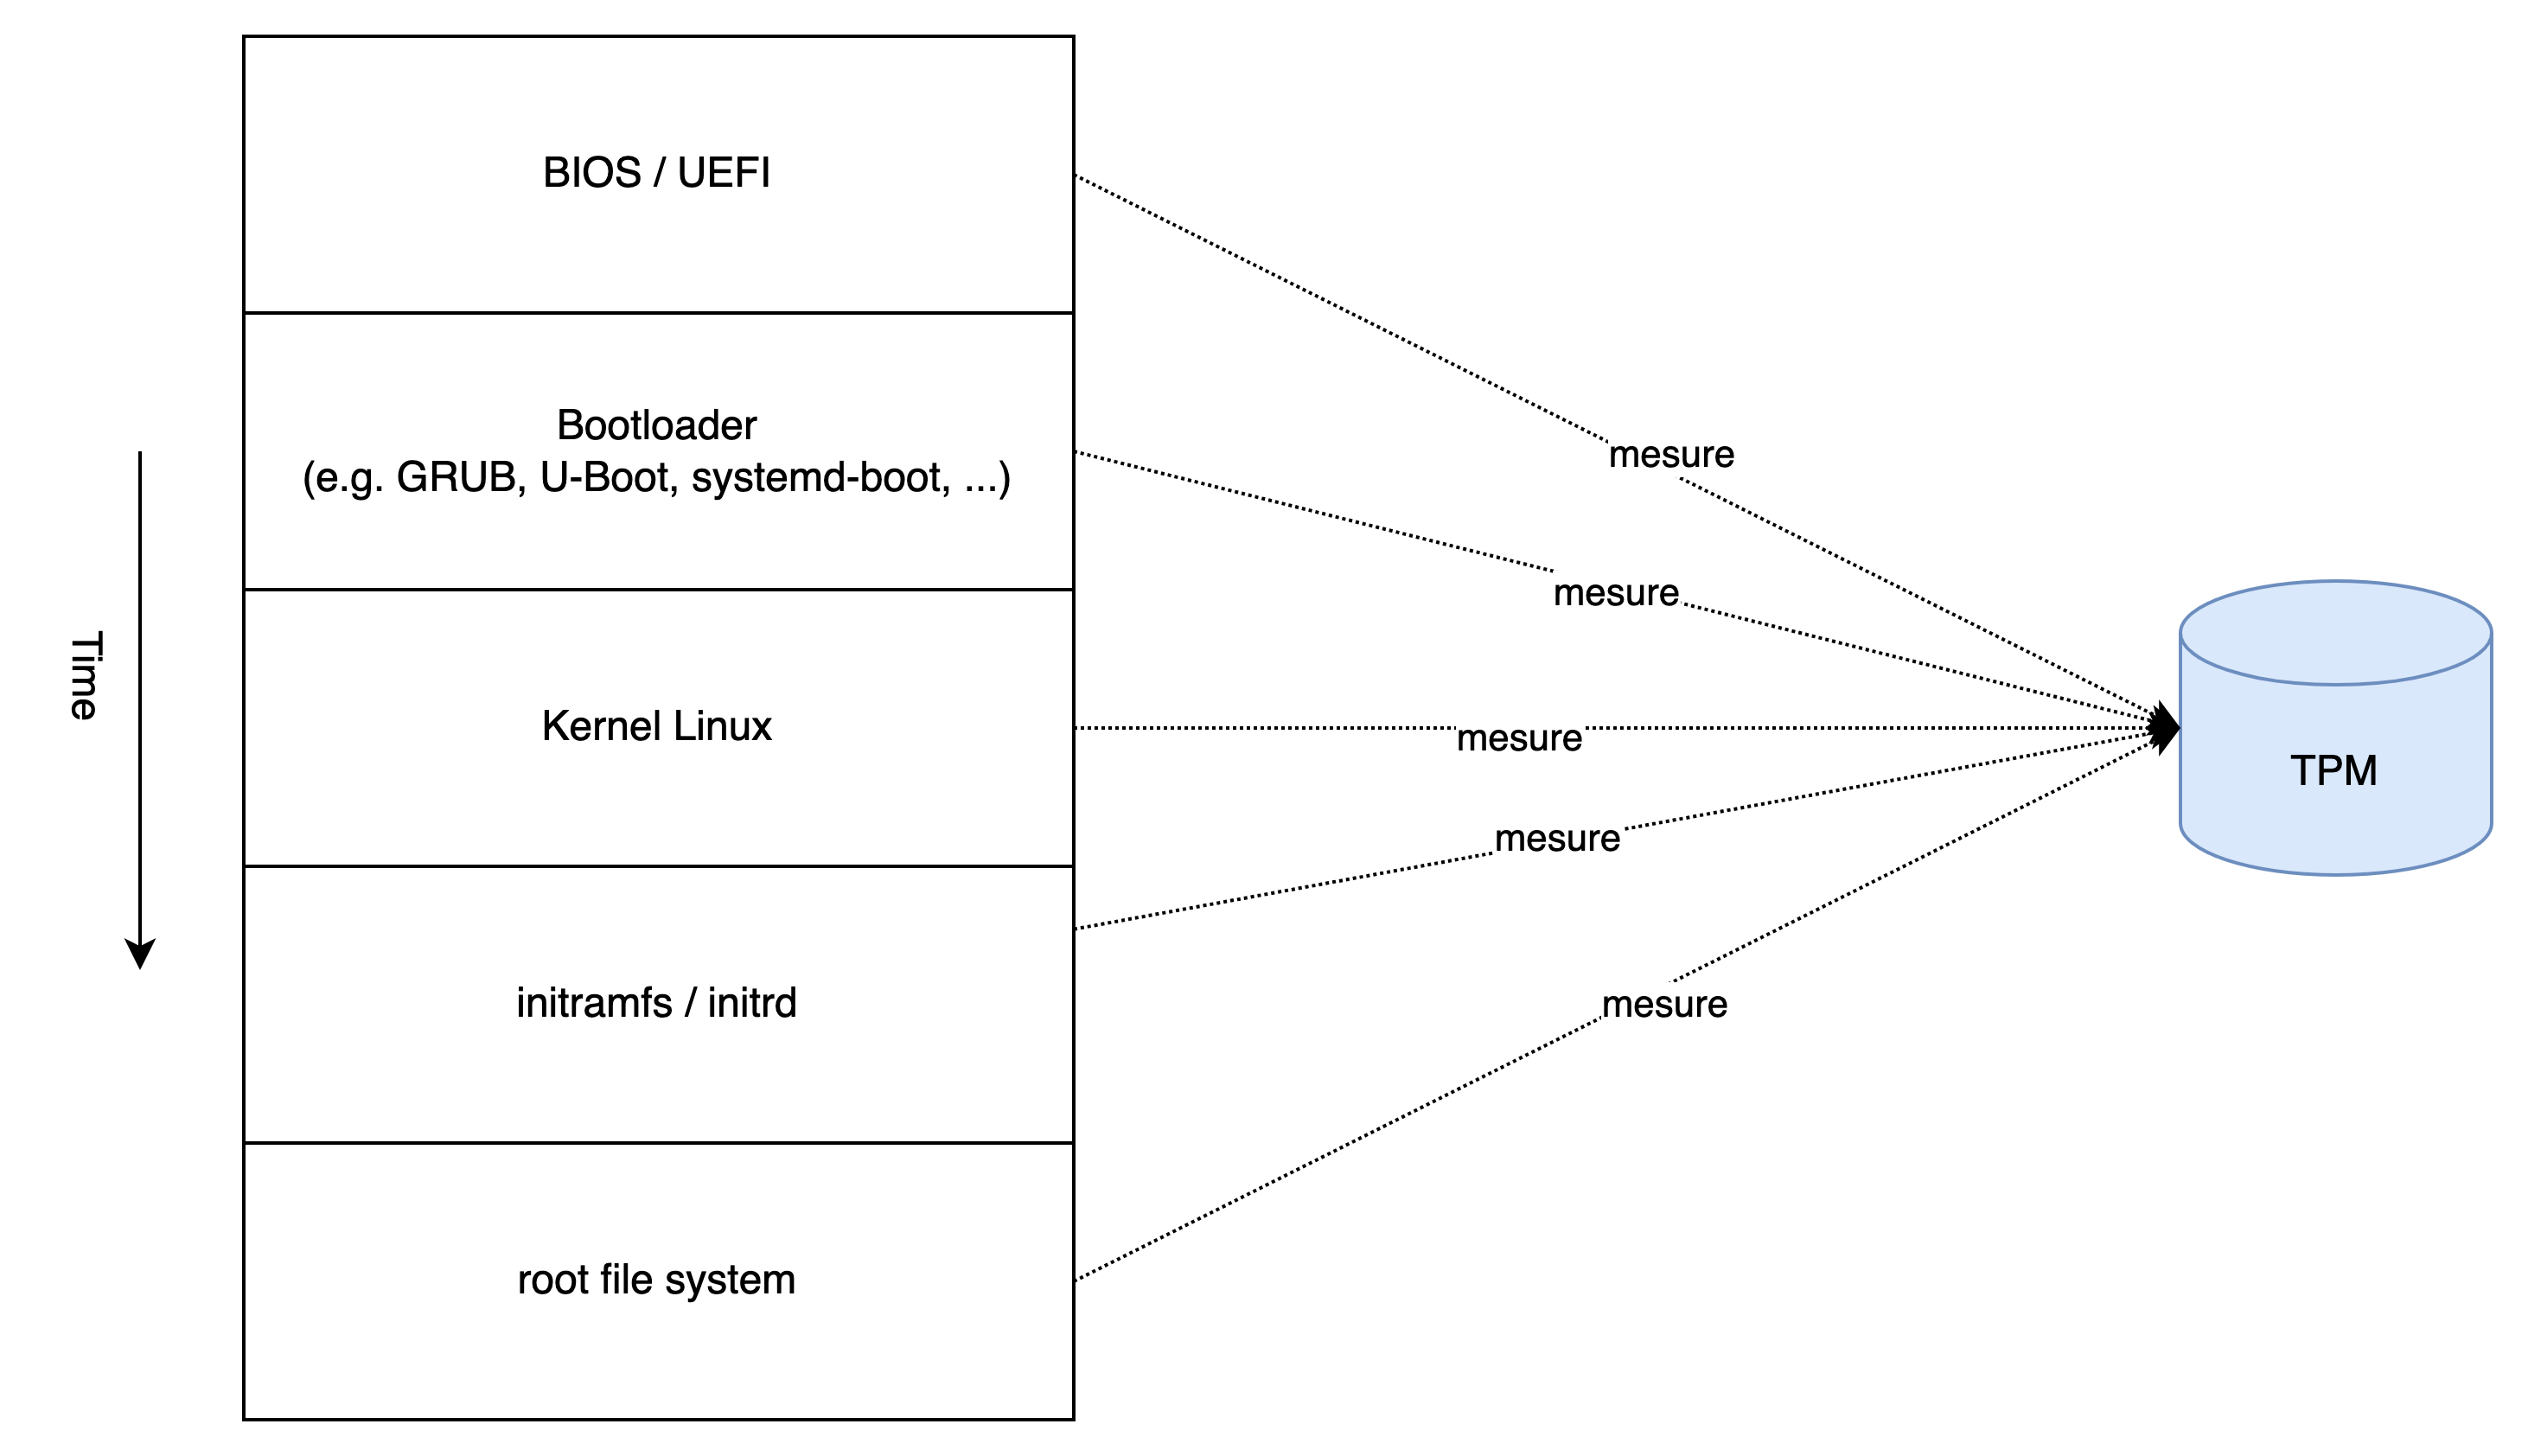
These measurements could be stored in memory or on the filesystem, but that would allow a malware to alter them. Conversely, the TPM is a standalone component 4 dedicated to this task and incapable of executing code from external sources (e.g. malware).
Similarly, a TPM solves the issue of storing a secret on disk. Historically, this problem was simply shifted, leading to the following situation: « I will encrypt my secret with a symmetric key 💡 but where should I store this key?! 🤯».
Fortunately for us, the TPM elegantly solves this problem by providing the encryption key (which is not exportable).
This type of principle is used, for example, by BitLocker or systemd (i.e. systemd-cryptenroll).
It is even possible to combine these two concepts and ensure that the unseal mechanism is only allowed if the machine is in a trusted state, thanks to integrity measurements. We will explore this in more depth in the upcoming pills, but this already gives you a glimpse of the vast capabilities provided by a TPM.
The spec has been produced and is maintained by a consortium called Trusted Computing Group (TCG).
TCG has also produced other specs that revolve around TPMs.
Different kinds of TPM
Note: this section quotes content from TPM 2.0: A Brief Introduction produced by TCG (Trusted Computing Group).
You need to have in mind that there are different kinds of TPMs, each with its own security level and cost. The choice of a TPM will depend on the security level required by the system and the budget allocated to it:
- Discrete TPM: « provides the highest level of security
[...]. The intent of this level is to ensure that the device it’s protecting does not get hacked via even sophisticated methods. To accomplish this, a discrete chip is designed, built and evaluated for the highest level of security that can resist tampering with the chip, including probing it and freezing it with all sorts of sophisticated attacks. » - Integrated TPM: « is the next level down in terms of security. This level still has a hardware TPM but it is integrated into a chip that provides functions other than security. The hardware implementation makes it resistant to software bugs, however, this level is not designed to be tamper-resistant. »
- Firmware TPM: « is implemented in protected software. The code runs on the main CPU, so a separate chip is not required. While running like any other program, the code is in a protected execution environment called a trusted execution environment (TEE) that is separated from the rest of the programs that are running on the CPU. By doing this, secrets like private keys that might be needed by the TPM but should not be accessed by others can be kept in the TEE creating a more difficult path for hackers. In addition to the lack of tamper resistance, the downside to the TEE or firmware TPM is that now the TPM is dependent on many additional aspects to keep it secure, including the TEE operating system, bugs in the application code running in the TEE, etc. »
- Software TPM: « Software TPM can be implemented as a software emulator of the TPM. However, a software TPM is open to many vulnerabilities, not only tampering but also the bugs in any operating system running it. It does have key applications: it is very good for testing or building a system prototype with a TPM in it. For testing purposes, a software TPM could provide the right solution/approach. »
- Virtual TPM: « is part of the cloud-based environment and it provides the same commands that a physical TPM would but it provides those commands separately to each virtual machine. »
| Trust Element | Security Level | Security Features | Relative cost | Use Case |
|---|---|---|---|---|
| Discrete TPM | Highest | Tamper resistant hardware | 💲💲💲 | Critical systems |
| Integrated TPM | Higher | Hardware | 💲💲 | e.g. Network gear |
| Firmware TPM | High | TEE | 💲 | Non-critical systems |
| Software TPM | N/A | N/A | Free | Testing and prototyping |
| Virtual TPM | High | Hypervisor | Cheap | Cloud environment |
Table: TPM classification
Conclusion
In this brief introduction, my goal was to present the key features that make the TPM an essential component for establishing a paradigm focused on security. It is also in this spirit that Microsoft requires a TPM 2.0 to install Windows 115 6 on a machine.
Up until now, this is the first time I mention TPM 2.0. TPM 2.0 is simply the version that follows TPM 1.2. Just consider that the second iteration was designed to address several issues and that it is now de facto the industry standard.
note: every time I use the term TPM, I always refer to TPM 2.0.
If you’re interested in the differences between TPM 1.2 and TPM 2.0, I recommend you to read this documentation provided by Microsoft.
Please note that in this first pill, I haven’t mentioned all the features offered by a TPM (e.g., authorization system, auditing, etc.). However, those I believe important will be covered in next pills.
For the sake of impartiality, I must highlight the drawbacks inherent in using a TPM:
- Resources are limited (storage, memory)
- Cryptographic operations (e.g., key generation, signatures, encryption) are much slower than on other devices (due to the previous point)
- You have to be aware of many concepts to use or administrate TPMs properly - but don’t worry,
TPM pillswill guide you through them!
What’s about Apple devices?
Contrary to Microsoft and Linux, Apple made the decision to use a proprietary solution called Secure Enclave.
If you are a macOS user, you can still stay with us because most of the examples will use a Software TPM which you will be able to run on your machine.
Next pill…
…we will setup a minimal environment to interact with a TPM in your running system.
🚧 TPM Pills is in beta 🚧
- if you encounter problems 🙏 please report them on the tpm-pills issue tracker
- if you think that
TPM Pillsshould cover a specific topic which isn’t in the roadmap, let’s initiate a discussion 💬
-
via a
Secure Bootor aMeasured Boot. ↩ -
it has its own memory (RAM) and its own storage, although the resources are very limited. ↩
-
This decision by a tech giant led to a drop in TPM prices. ↩
Install tooling in Your Running System
The goal here is to prepare your environment to run the examples provided in TPM Pills, if (like me) you only trust what you see with your own eyes. It’s not a requirement. Indeed, you can limit yourself to read the content and code snippets. However, I strongly recommend you to read and run the examples to better understand the concepts.
Disclaimer regarding Windows
So far, my experience with TPMs has been exclusively limited to a Linux context — this is why, I am open to feedback from Windows users, if they encounter any issues.
Unfortunately, according to this issue, TPM is not added to WSL (Windows Subsystem for Linux), so it will be necessary to run commands from the host machine.
Prerequisites
TPM Pills will require you to have the following tools (in addition to git):
| Tool | Description | Linux Support | Windows Support | MacOS Support |
|---|---|---|---|---|
go >= v1.22 | A language that no longer needs an introduction | ✅ | ✅ | ✅ |
| openssl | Crypto Swiss Army Knife which here is a dependency for using the Software TPM | ✅ | ✅ | ✅ |
| swtpm | A Software TPM Emulator | ✅ | ✅ (using Cygwin) | ✅ |
| tpm2-tools | A CLI (Command-Line Interface) for interacting with a TPM | ✅ | ❌ | ❌ |
Table: Tooling support per Operating System
tpm2-tools is a great tool to have in your toolbox! However, since it is not available everywhere, it will be used sparingly.
Note:
PowerShellprovides some commands to interact with a TPM, but they will not be covered here.
Why go?
Most educational content on the subject is in C… but why follow the crowd, right?!
More seriously:
- I am not an experienced C developer, but I am proficient in Go
go-tpmprovides a rich interface for communicating with a TPM- In the upcoming pills, we will make the TPM interact with a server in gRPC, and Go allows me to do this easily
- More and more projects in Golang ecosystem use TPMs (e.g., spire, sks, u-root, constellation, etc.)
Fundamentally, since the TPM 2.0 interface is a standard, all the concepts we will cover here are also applicable in other languages.
TPM 2.0 Clients
For those interested, here is a (probably non-exhaustive) list of TPM 2.0 clients.
| Name | Language | Description |
|---|---|---|
| tpm2-tss | C | Intel implementation of TCG’s TPM Software Stack (TSS). The current standard meter bar regarding TPM libraries. |
| ibmtss | C | IBM implementation of TPM Software Stack (TSS) but not API compatible with TCG TSS. |
| wolfTPM | C | TPM 2.0 librairy designed for embedded system. |
| go-tpm | golang | |
| tpm2-pytss | python | Wrapper of tpm2-tss. |
| tpm-rs | rust | |
| rust-tss-fapi | rust | Wrapper of libtss2-fapi which is an upper API provided by tpm2-tss named FAPI1. Warning: project’s maintainers underline that the implementation is experimental and shouldn’t be use in production. |
| TSS.MSR | c#, c++, java, nodejs and python |
Table: TPM libraries
Installation
OCI
🚧 TBD 🚧
Nix
If you are a Nix user, TPM Pills provides a Nix shell (i.e. shell.nix) at the root of the repository.
To install dependencies, simply run the following commands:
git clone https://github.com/loicsikidi/tpm-pills.git
cd ./tpm-pills
# launch the derministic shell
nix-shell

# inside the shell
go version
tpm2 --version
Note: with this method
tpm2-toolswill only be installed on a Linux platform.
Devbox
For those who are unfamiliar, Devbox is a layer on top of Nix that allows you to obtain a deterministic shell without having to master the Nix language.
If you are a Devbox user, TPM Pills also provides a configuration (i.e. devbox.json) at the root of the repository.
To install dependencies, simply run the following commands:
git clone https://github.com/loicsikidi/tpm-pills.git
cd ./tpm-pills
# launch the derministic shell
devbox shell

# inside the shell
go version
tpm2 --version
Note: with this method
tpm2-toolswill only be installed on a Linux platform.
Manually
- go: Use your preferred package manager or download the binary from the official website
- openssl: Use your preferred package manager or get the sources from the official website
- swtpm: Use your preferred package manager or build the sources by following the official documentation
- tpm2-tools: Use your preferred package manager or build the sources by following the official documentation
Example: validate TPM’s version
Let’s finally get to the serious stuff! We will check the version of the TPM installed on your machine and ensure that it is a TPM 2.0. We will be able to do this by interacting directly with the TPM using a command called TPM2_GetCapability.
On Linux, access to the Hardware TPM is secured by sudo rights. It is possible to have finer control using a udev policy to allow specific users or groups to access it (e.g., the policy available in NixOS).
tpm2-tools
Only works on Linux.
# dependending on your config it might require 'sudo'
tpm2_getcap properties-fixed | grep -i pt_family_indicator -A 2
You should get the following output:

go
The script will works on all environments (on Darwin, the code relies on a Software TPM).
Run the following command:
# dependending on your config it might require 'sudo'
go run github.com/loicsikidi/tpm-pills/examples/02-pill

# output:
# TPM Version: 2.0
Depending on your local setup, you can also run the following command:
# nix command
nix-shell --run "go run github.com/loicsikidi/tpm-pills/examples/02-pill"
# devox command
devbox run -- go run github.com/loicsikidi/tpm-pills/examples/02-pill
Next pill…
…we will see in much more details how we can interact with a TPM.
🚧 TPM Pills is in beta 🚧
- if you encounter problems 🙏 please report them on the tpm-pills issue tracker
- if you think that
TPM Pillsshould cover a specific topic which isn’t in the roadmap, let’s initiate a discussion 💬
-
Feature API ↩
How to interact with a TPM?
Introduction
It’s important to keep in mind that a TPM is primarily a passive device. By “passive”, I mean that a TPM will never act on its own—it always responds to a request. This behavior could be compared to a REST API, for example. The specification1 defines a set of commands (a little over a hundred) that a TPM must support, along with the associated interface contract.
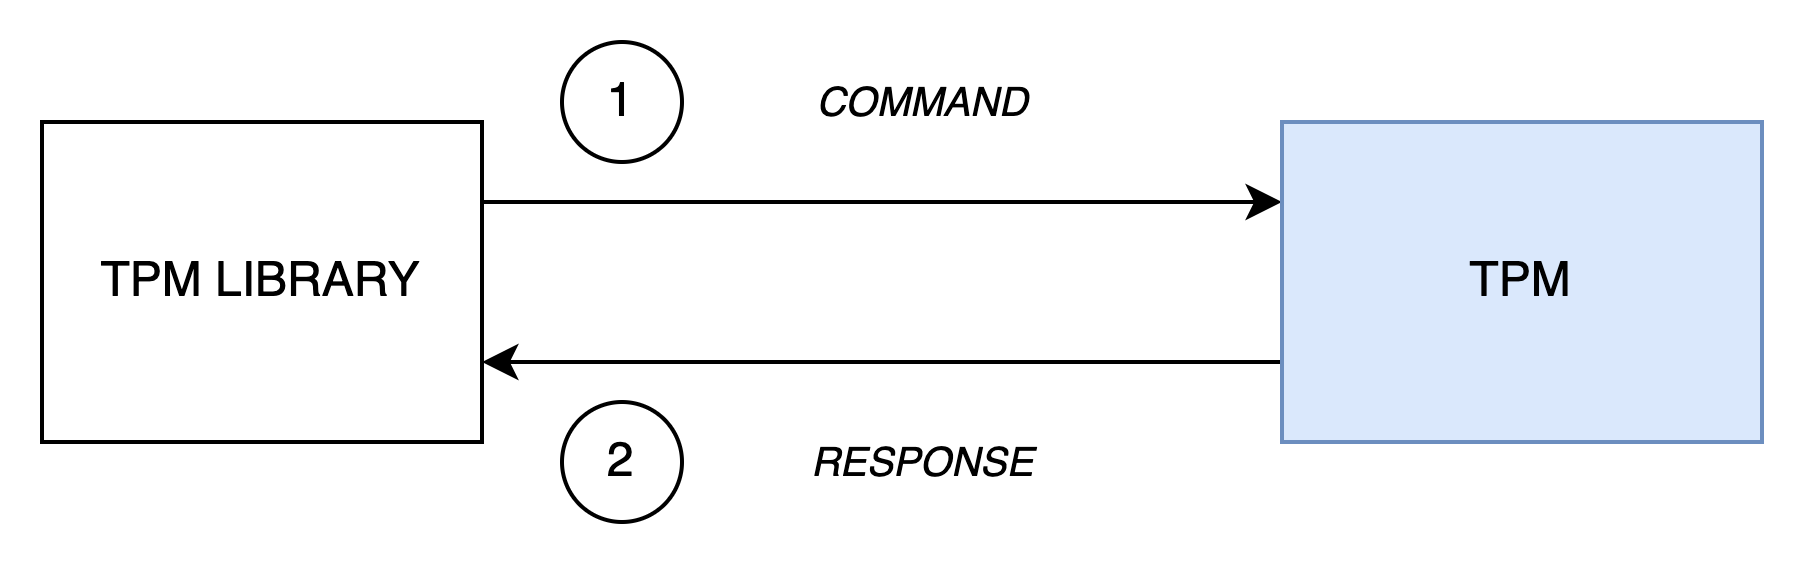
In the previous pill, we used the TPM2_GetCapability command to display the TPM version. This command is very useful because it provides a set of information about a TPM (static data) and its current state (dynamic data). The two libraries (tpm2-tools and go-tpm) that we used did more or less the same thing:
- The library created the
TPM2_GetCapabilitycommand in accordance with the specification - The command was sent to the TPM2
- The command was received and interpreted by the TPM
- The TPM produced a response in accordance with the specification
- The response was sent back to the client2
Local Access
The content below focuses on Linux.
Let’s take a closer look at the transmission part (steps 2 and 5), as this is a topic that’s often overlooked. The diagram above describes a somewhat simplistic interaction. In reality, a TPM client never has a direct connection to a TPM, which, let’s remember, is a physical device. It’s the operating system that provides an interface to bridge the userspace and the hardware.
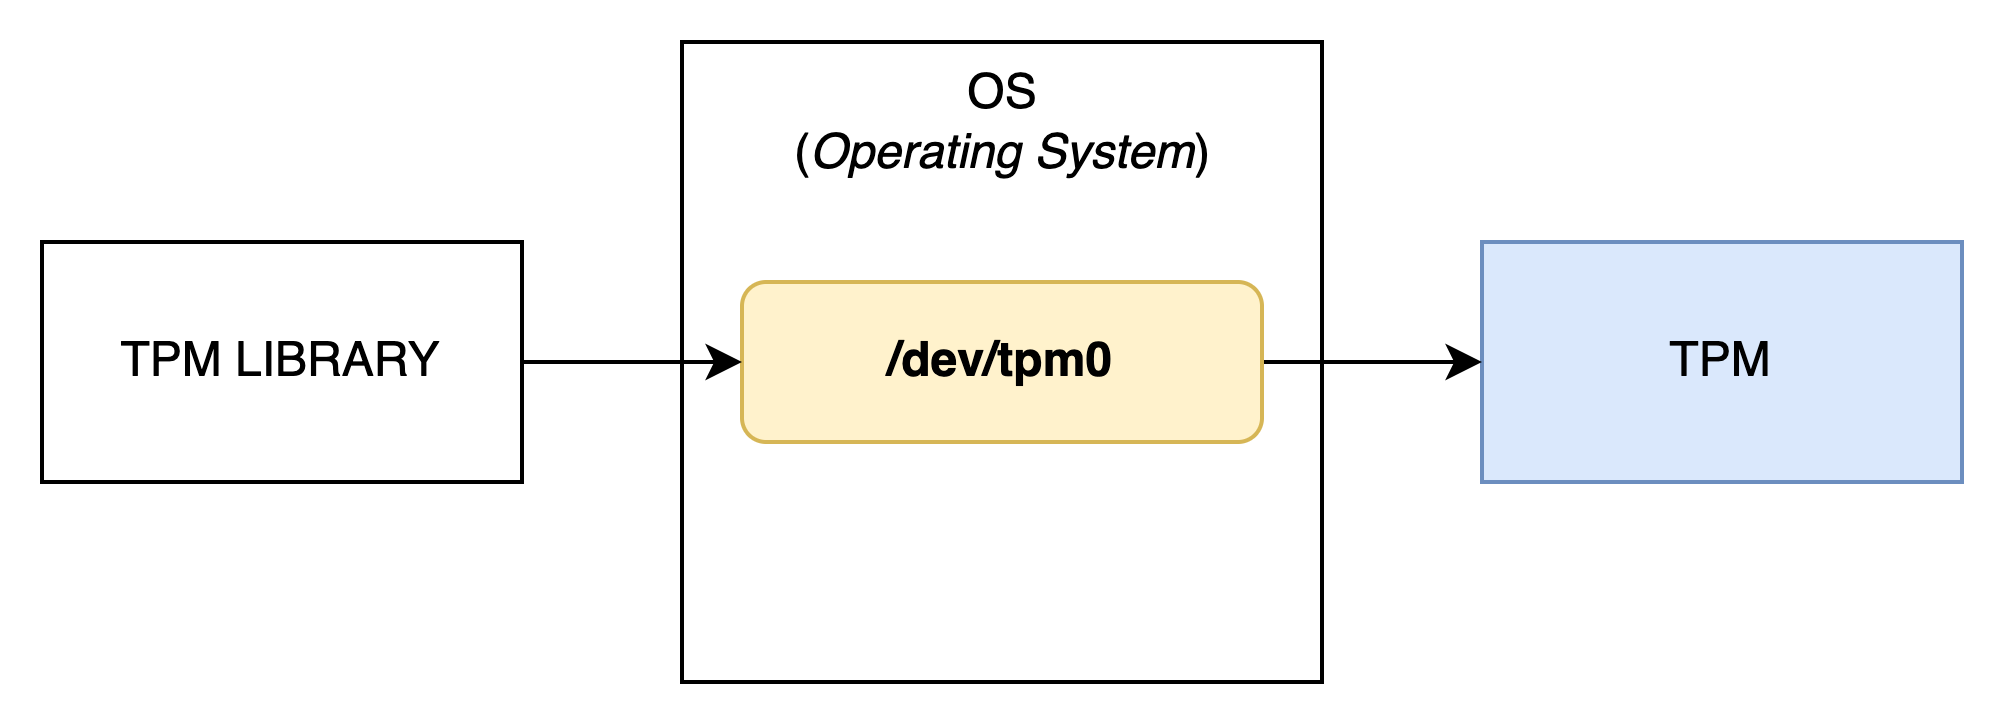
The device is usually named /dev/tpm0.
As we saw in pill #1, a TPM is characterized by being resource-efficient, which is why it does not natively manage multi-tenancy when several applications need to communicate concurrently with it. To address this issue, the TCG produced a specification (TCG TSS 2.0 TAB and Resource Manager) describing how to implement this logic.
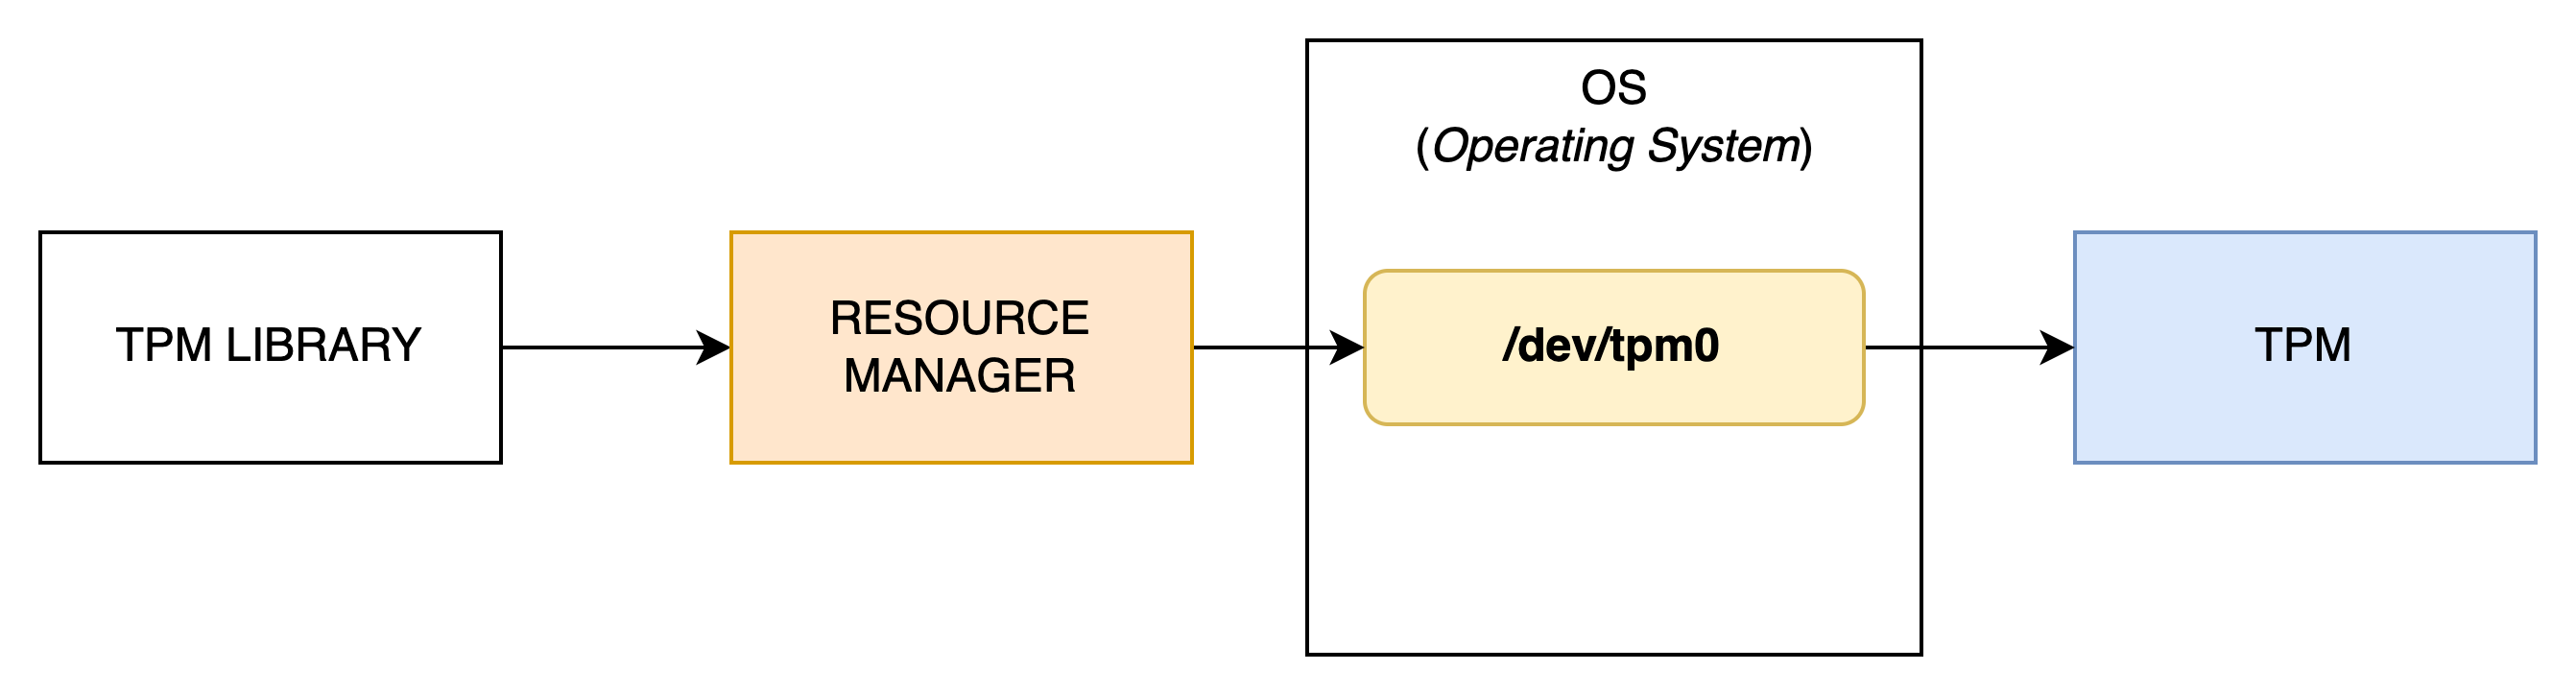
tpm2-abrmd is an implementation of that spec.
Adding this functionality unfortunately requires installing an additional tool on your machine and maintaining it in an operational state. Fortunately for us, starting from kernel version 4.123, the Resource Manager is a service directly integrated into the OS—which greatly simplifies integration. In summary, if your application communicates with a TPM, it will generally follow the pattern below:
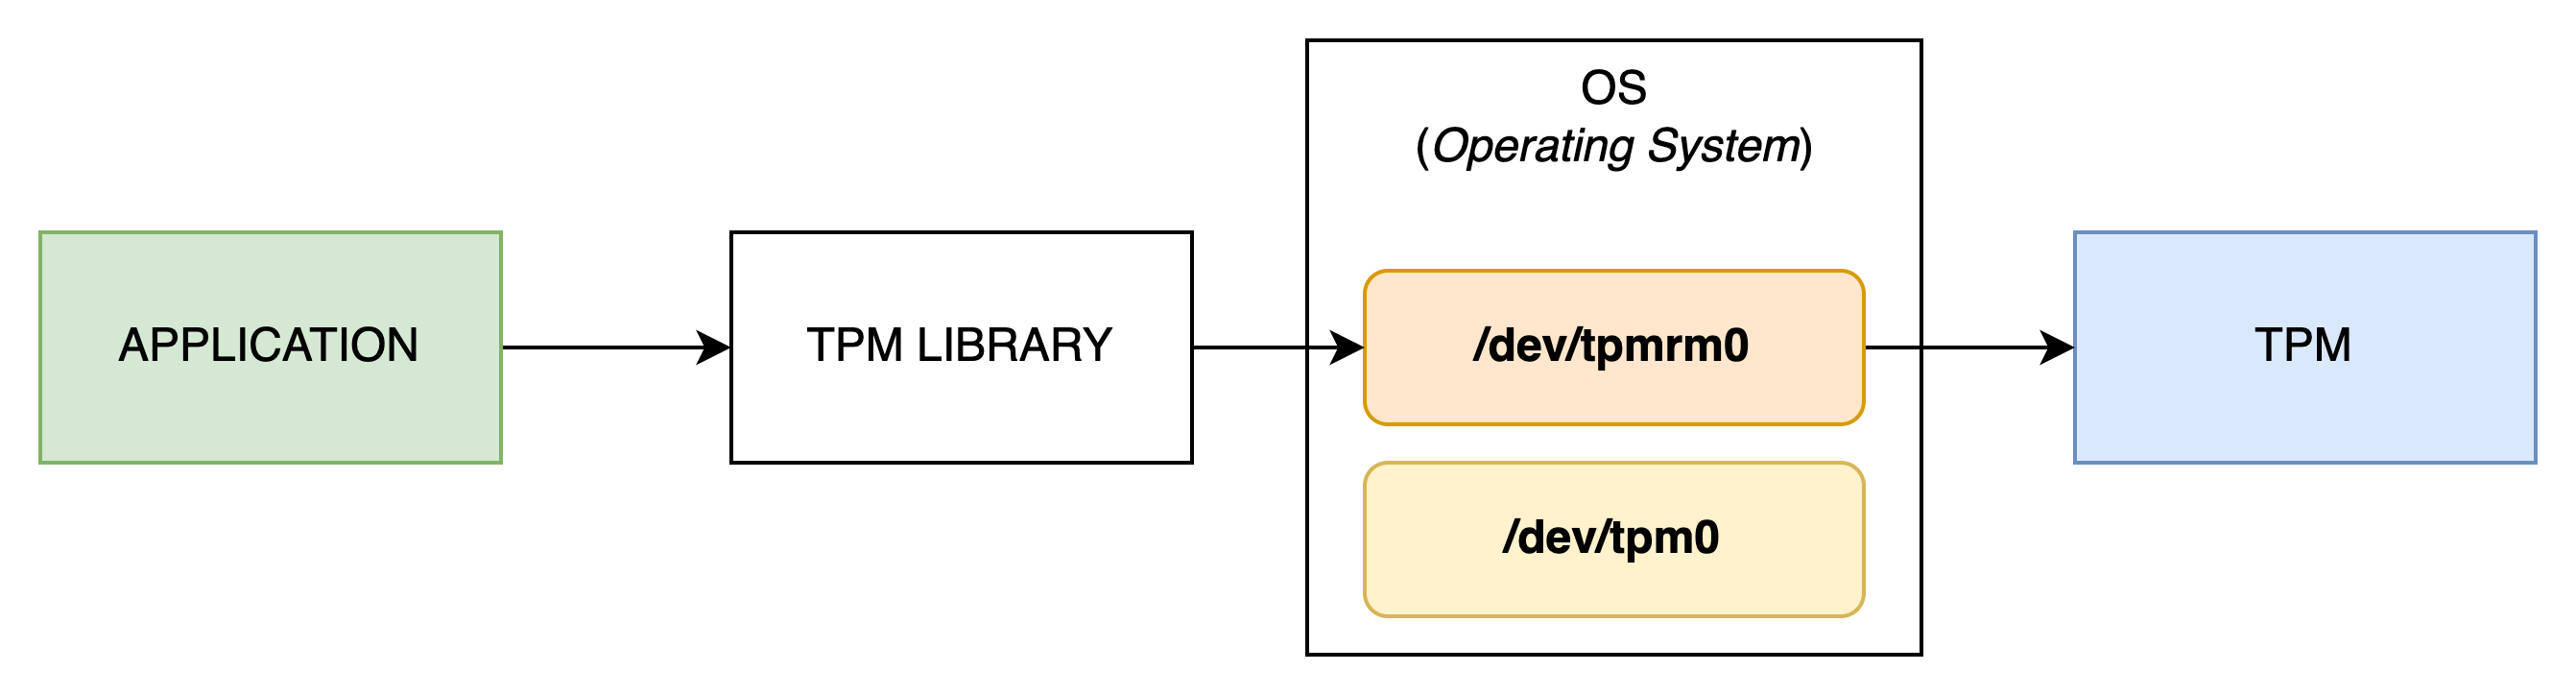
As you’ve noticed, the OS provides a new device named /dev/tpmrm0. It is preferable to use it to take advantage of the features offered by the Resource Manager.
By default, the data flow is unencrypted; however, we’ll see in a dedicated pill how it is possible to encrypt it.
Limitations
In most distributions, the devices dedicated to the TPM are owned by the root user.

Screenshot from a NixOS Laptop
This has significant implications, as it requires your application to be run with root privileges—an unacceptable situation in many contexts (e.g., general public usage). By comparison, a Yubikey will ask the user to enter a PIN or press the device to unlock access to keys, without the underlying driver requiring root privileges. The concept of authorization exists on a TPM, so there’s fundamentally nothing preventing a rootless approach.
Unfortunately, there is no consensus on the subject that would allow all applications to communicate with a TPM in a rootless manner. As of now, the hack consists of requiring the user to install tpm2-tss in order to benefit from its udev rules, which have become a sort of unofficial standard. Admittedly, this method is not ideal, for two reasons:
- It installs a binary that might not even be used
tpm2-tssis not necessarily packaged on all distributions
Nevertheless, it allows you to achieve the following result:

Screenshot from a NixOS Laptop
Note: in the different labs, we won’t be affected by this issue, as we’ll be using a Software TPM.
What about Windows?
Since Windows 8 and Windows Server 2012, the operating system includes TBS (TPM Base Services), which is an interface that centralizes access to the TPM through RPC calls4. The following illustration shows the relationship between TBS and the TPM:
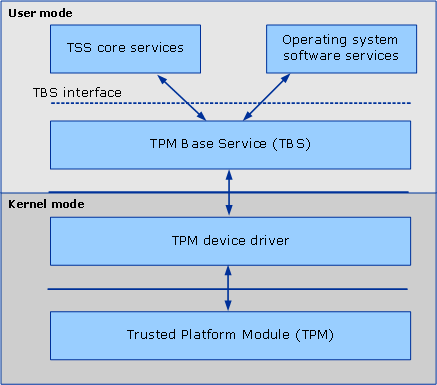
source: https://learn.microsoft.com/en-us/windows/win32/devio/tpm-base-services
For security reasons, TBS only accepts calls originating from the host machine.
Remote Access
We’ve seen how to interact with a TPM locally, but is it possible to do so remotely? The answer is yes. tpm2-tss implements a number of drivers5 that enable remote access. There are two approaches—either via SSH access or via a TCP socket.
As an example, the TCP approach is the one used by many simulators such as:
The most important thing is to remember that this type of access exists. If your context requires it, keep in mind that establishing an encrypted channel is a prerequisite to prevent any man-in-the-middle attacks.
Bonus: an exotic TPM
It’s worth knowing that a TPM can also be located outside of a machine, for example… on a USB stick! That’s the rather wild idea proposed by LetsTrust-TPM2Go, offering a portable TPM.
Technically, this is a TPM that responds to SPI (Serial Peripheral Interface) inputs; then, libusb is used to connect the USB device with the host.
 source: https://github.com/tpm2-software/tpm2-tss/blob/master/doc/tcti.md#tcti-spi-ltt2go
Acknowledgement
This pill is derived from Trusted Computing 1101: Introductory Trusted Platform Module (TPM) usage class, available at https://ost2.fyi/TC1101.
To be precise, I take 2 elements from this content:
- the term “passive device”
- the discovery of the existence of
LetsTrust-TPM2Go
The rest of the pill is original content.
Conclusion
In this pill, we’ve seen how we can interact with a TPM and, most importantly, the wide range of methods available to us—whether for local or remote access.
Next pill…
…we will create our first key and discover how the TPM manages such resources.
🚧 TPM Pills is in beta 🚧
- if you encounter problems 🙏 please report them on the tpm-pills issue tracker
- if you think that
TPM Pillsshould cover a specific topic which isn’t in the roadmap, let’s initiate a discussion 💬
-
more precisely in Part 3: Commands ↩
-
released on July 2, 2017 ↩
-
Remote Procedure Call ↩
-
these “drivers” are an implementation of the TPM Command Transmission Interface (TCTI). Please refer to this document for more information. ↩
Create a TPM key
Let’s start by introducing few concepts before getting our hands dirty.
Concepts
Key Hierarchy
A TPM manages its keys in a rather unique way by applying the principle of hierarchy.
Let’s analyze the diagram below to better understand this concept:
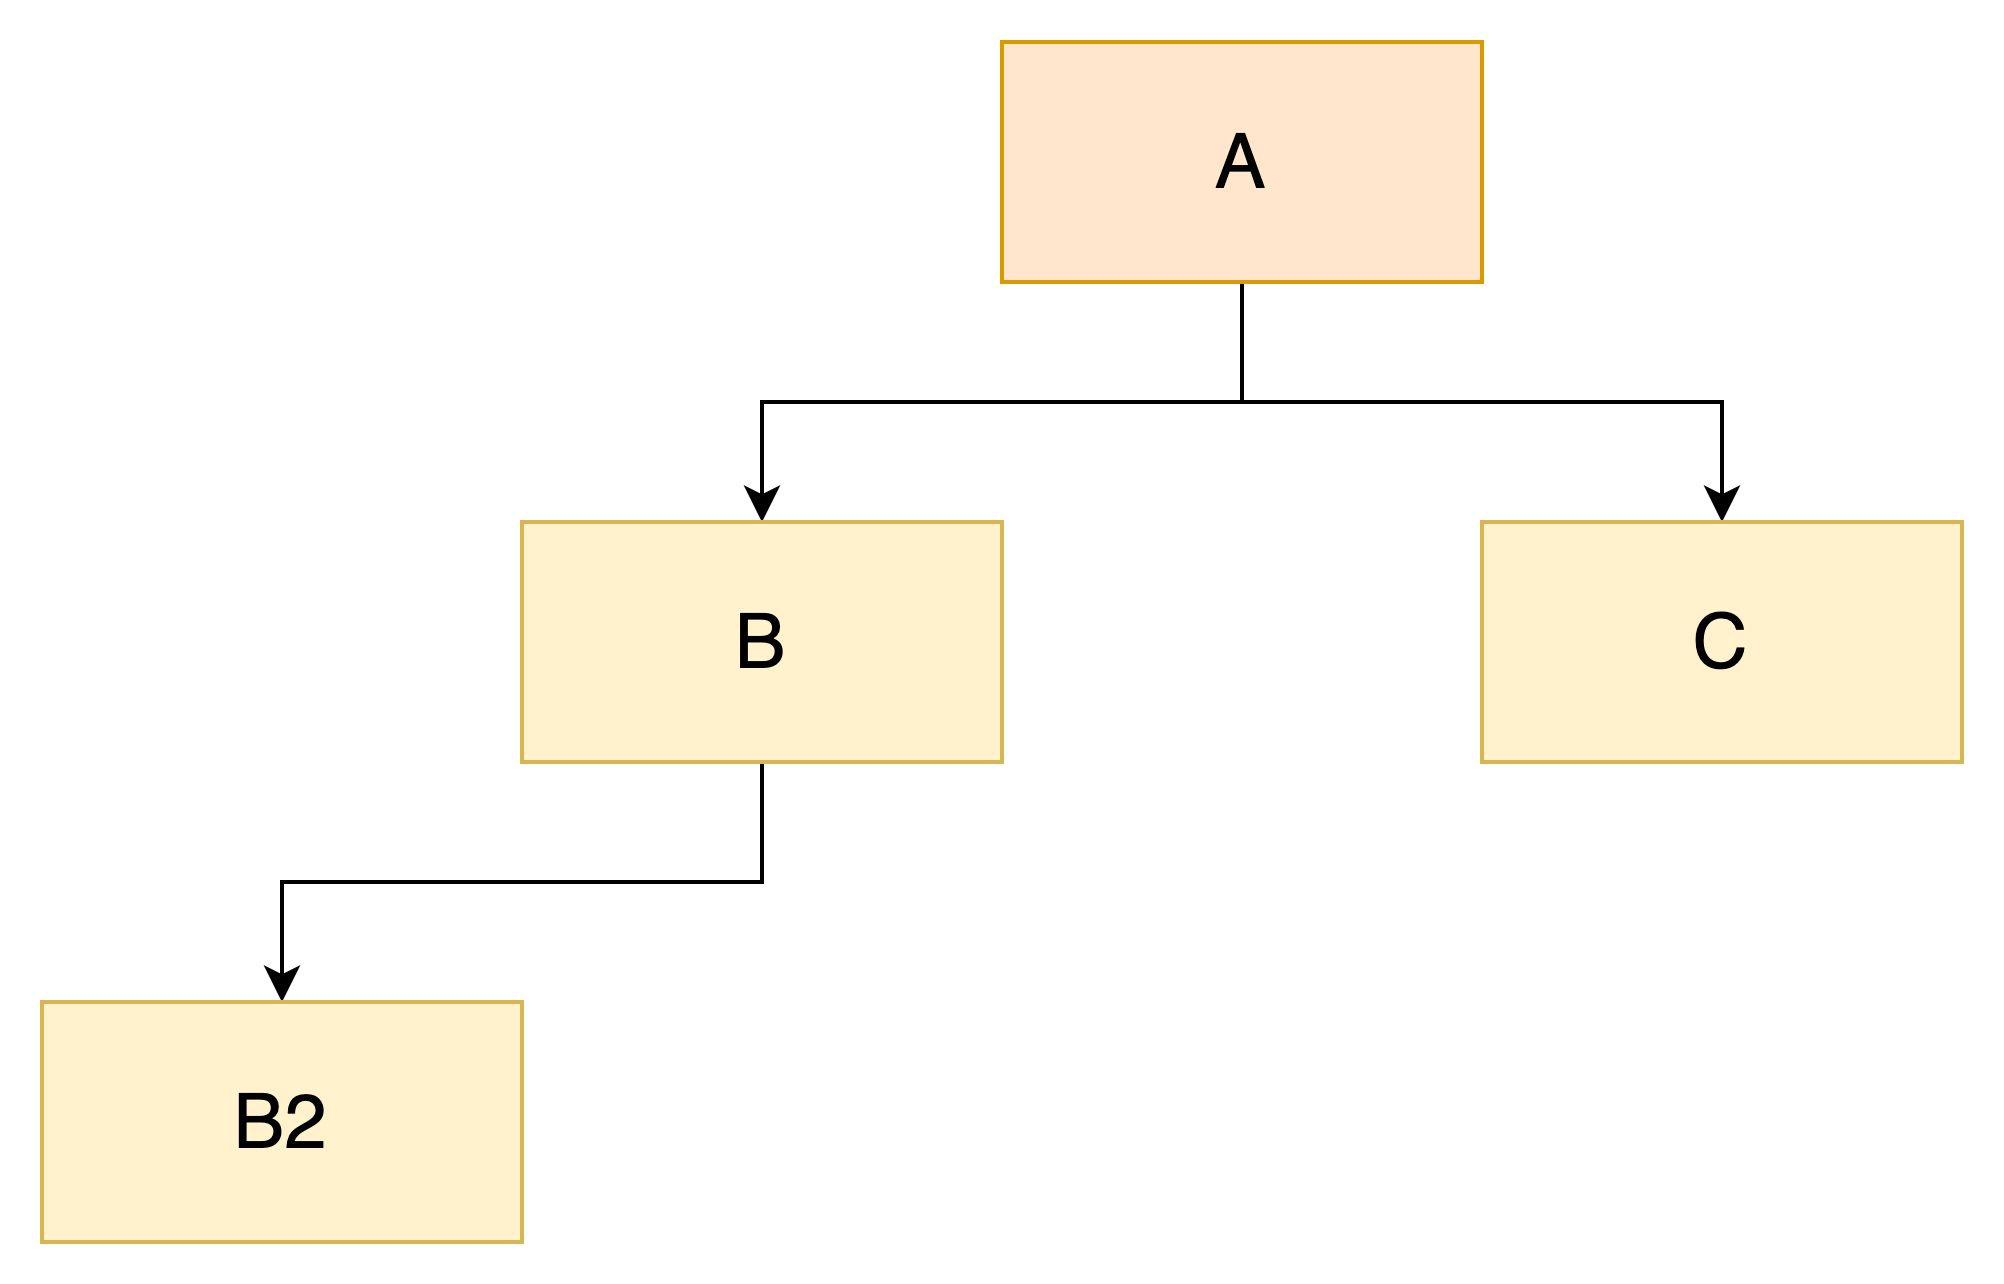
The diagram represents a tree with the following relationships:
Ais the parent ofBandCBis the parent ofB2
This model directly maps to how a TPM organizes its keys, which are divided into two types:
- Primary key: a resource with no parent (e.g.,
A) - Ordinary key: a resource that has a parent (e.g.,
B,B2, andC)
Notes:
- A key has only one parent
- An ordinary key can itself be the parent of another key (e.g.,
B)- A key can have multiple children (e.g.,
A)
This parent/child distinction explains why two separate commands exist for key creation:
TPM2_CreatePrimary: creates a primary keyTPM2_Create: creates an ordinary key (which requires a reference to a parent key)
Moreover, all keys belong to a specific tenant referred to as a hierarchy in the TPM specification1 which I admit can be confusing. Each TPM 2.0 implementation provides exactly four fixed tenants/hierarchies, which can be disabled if needed2.
What is the rationale behind this design?
The spec assumes a TPM may be used in different contexts, so fine-grained access control is needed to support multiple roles. Each hierarchy has its own independent authorization scheme2.
Below is a full list of hierarchies:
| Name | Purpose | Type |
|---|---|---|
| Storage or Owner hierarchy | Intended for non-privacy-sensitive operations by the platform owner (e.g., an IT department, the end user). | Persisted |
| Platform hierarchy | Intended to be under the control of the platform manufacturer3 for early boot tasks (e.g., BIOS, UEFI). In other words, it’s not meant to be used by the end user. | Persisted |
| Endorsement hierarchy | Intended for privacy-sensitive operations when the user or an organization has privacy concerns. | Persisted |
| Null hierarchy | Intended to store ephemeral objects (e.g. sessions, context, etc.) used internally by the TPM. The end user can use this hierarchy to use ephemeral keys that will be erased at reboot. | Volatile |
Table: Four TPM hierarchies
Privacy refers to mechanisms which prevent a third party from correlating or identifying that multiple keys originate from the same TPM.
Note: in a enterprise context, the opposite may be desirable for auditing and control purposes.
The diagram below summarizes the key ideas we’ve just covered:
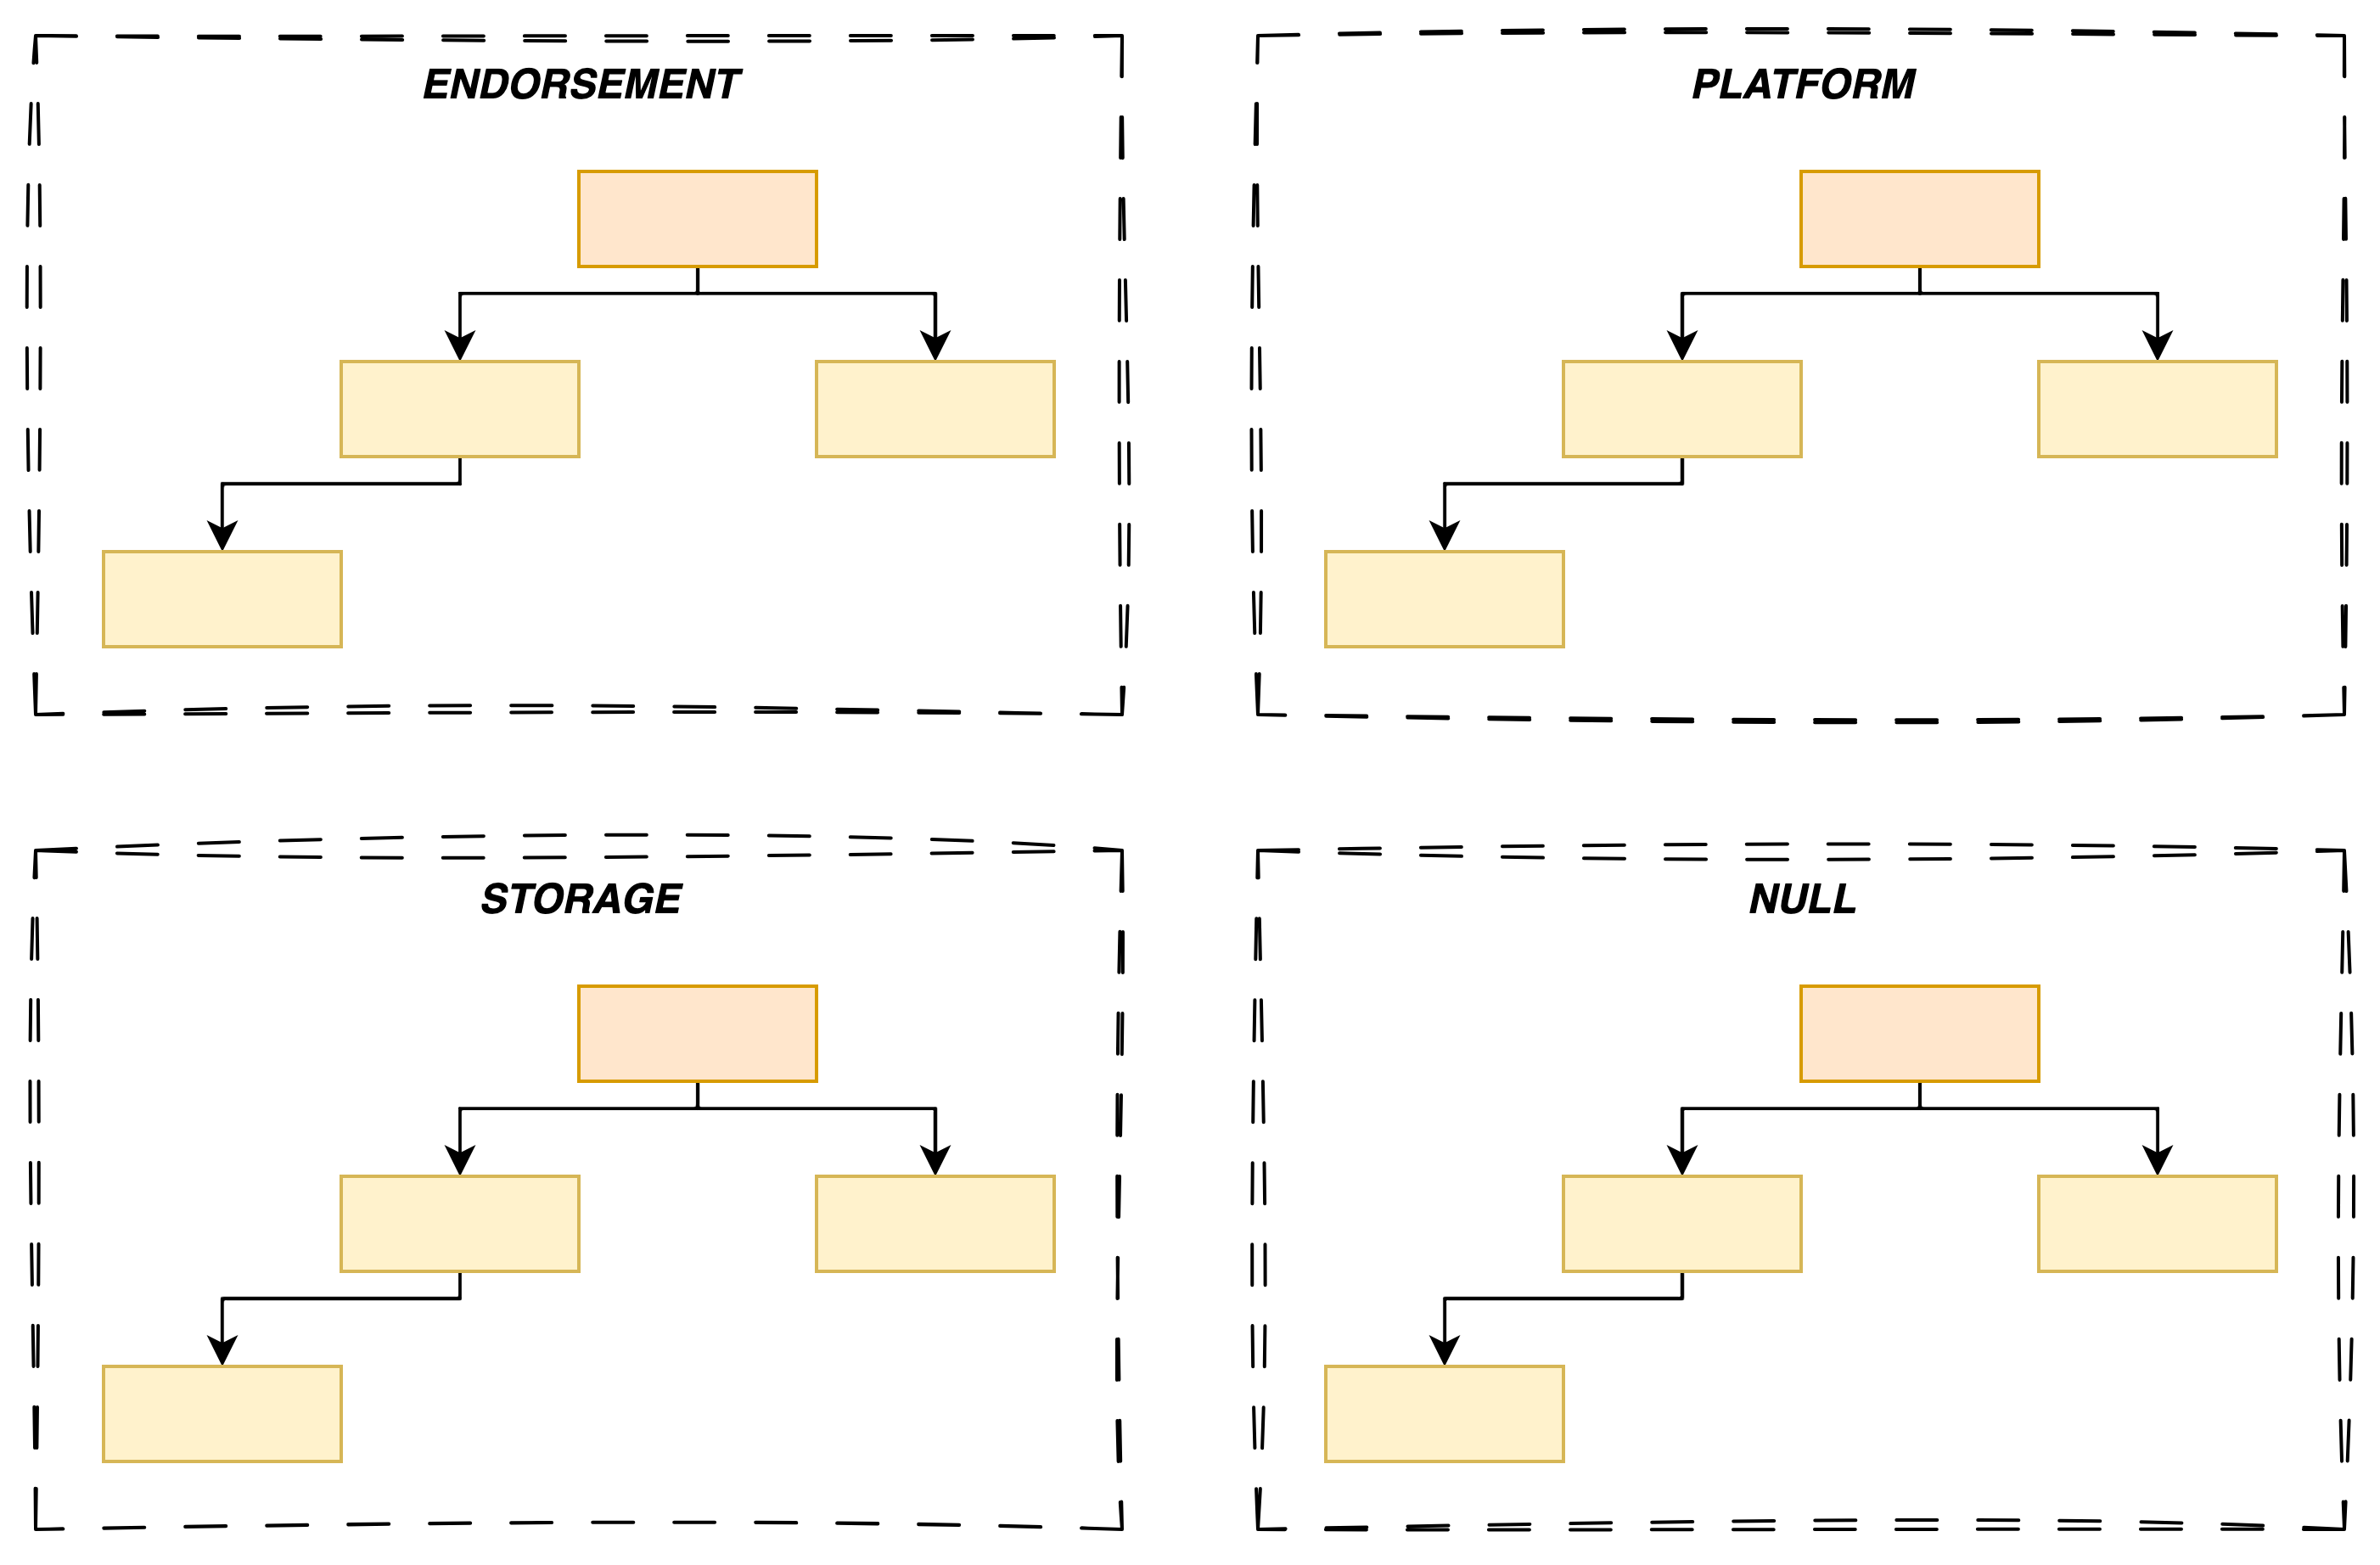
Most of the time, you will only use the Storage and Endorsement hierarchies.
Exceptionally, you may need to use the Null hierarchy if ephemerality is a requirement.
Reproducibility
Reproducibility is a fundamental primitive in a TPM. Indeed, the latter can regenerate a Primary Key bit-for-bit, eliminating the need for backups — at least for this kind of keys.
How does this work?
Each hierarchy is tied to a seed4, a complex string of characters generated randomly by the TPM and never exportable. When creating a key, the client provides inputs that describe the key’s desired characteristics. The TPM then derives the actual key using a Key Derivation Function (KDF)5, with two parameters: the inputs and the seed.
We can express this as the following equation:
\( KDF(inputsX, seedY) = keyXY \)
Since the seed is typically stable, the TPM can deterministically reproduce the key whenever needed.
Note: given the high entropy of seeds, it’s extremely unlikely that two TPMs will generate the same key.
Persisted vs. Volatile Hierarchies
Earlier, we distinguished between persisted and volatile hierarchies. Now that the seed concept has been introduced, we can clarify this:
- A persisted hierarchy maintains the same seed across reboots.
- A volatile hierarchy, by contrast, generates a new seed on every reboot, making its keys ephemeral.
With sufficient privileges, it’s possible to force a seed rotation for any persisted hierarchy — but this will invalidate all previously created keys.
Use this operation with caution.
Key Attributes
When creating a key, you define its properties through a set of attributes.
Here’s a non-exhaustive list of possible attributes:
| Name | Description |
|---|---|
sign | The key can sign data |
decrypt | The key can decrypt data (it previously encrypted) |
restricted | The key can sign or encrypt internal TPM data |
fixedTPM | The key cannot be duplicated |
fixedParent | The key cannot be duplicated to another parent |
sensitiveDataOrigin | The key was generated by the TPM itself6 |
Table: Key Attributes
A complete list is available here.
Typically, you will combine these attributes based on your use case.
Example: A Parent Key
As mentioned above in the key hierarchy section, a key can act as a parent to others. The TPM spec mandates that such a key conforms to the following pattern:
| sign | decrypt | restricted |
|---|---|---|
| 0 | 1 | 1 |
Why?
A TPM has limited storage. To manage keys securely outside the TPM (e.g., on disk), the parent key must be able to encrypt the private portion (i.e. TPM2B_PRIVATE) of its children.
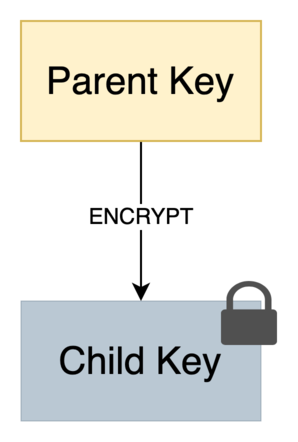
Later, when the private key is loaded into the TPM, the parent key decrypts the blob. Since TPM2B_PRIVATE is treated as an internal TPM resource, the key must have the restricted attribute.
In the spec, this kind of key is also called a Storage Parent.
A Practical Example
Now that we’ve covered the main ideas, let’s get hands-on!
- Create an ECC NIST P256 ordinary key (requires creating a primary key first)
- Store the key on the filesystem
- Load the key into the TPM
Creating the Primary Key
We start by creating the root key in the hierarchy. It MUST have both restricted and decrypt attributes set to TRUE to be considered a Storage Key. We provide this information to the TPM2_CreatePrimary command as shown in the snippet below:
// without error handling for more clarity
createPrimaryCmd := tpm2.CreatePrimary{
	PrimaryHandle: tpm2.TPMRHOwner, // indicates in which hierarchy the key must belong (Owner == Storage)
	InPublic:      tpm2.New2B(tpm2.TPMTPublic{
		Type:    tpm2.TPMAlgECC, // type of key
		NameAlg: tpm2.TPMAlgSHA256,
		ObjectAttributes: tpm2.TPMAObject{
			FixedTPM:            true,
			FixedParent:         true,
			SensitiveDataOrigin: true, // indicates that the key must be produced by the TPM
			UserWithAuth:        true,
			// required attributes to get a storage key ⬇️
			Restricted:          true,
			Decrypt:             true,
			SignEncrypt          false,
		},
		Parameters: ... // truncated
	})
}
createPrimaryRsp, _ := createPrimaryCmd.Execute(tpm)
Creating the Ordinary Key
With the Storage Key created, we now have everything we need to create an ordinary key using the TPM2_Create command.
// without error handling for more clarity
createRsp, _ := tpm2.Create{
	ParentHandle: tpm2.NamedHandle{ // indicates a reference to the parent (i.e. storage key)
		Name:   createPrimaryRsp.Name,
		Handle: createPrimaryRsp.ObjectHandle,
	},
	InPublic: template,
}.Execute(tpm)
TPM2_Create’s response contains the following fields:
| Type | Name | Description |
|---|---|---|
| TPM2B_PRIVATE | outPrivate | the private portion of the object |
| TPM2B_PUBLIC | outPublic | the public portion of the created object |
| TPM2B_CREATION_DATA | creationData | contains a TPMS_CREATION_DATA |
| TPM2B_DIGEST | creationHash | digest of creationData.creationData using nameAlg of outPublic |
| TPMT_TK_CREATION | creationTicket | ticket used by TPM2_CertifyCreation() to validate that the creation data was produced by the TPM |
Table: TPM2_Create Response
The result contains two important fields: outPrivate and outPublic, which can safely be stored on disk because:
TPM2B_PUBLICis meant to be publicTPM2B_PRIVATEis opaque (because encrypted by the parent key)
Due to the TPM’s limited resources, keys are typically stored externally.
Loading the Ordinary Key
To load a key into the TPM, we need to use TPM2_Load command along with TPM2B_PUBLIC and TPM2B_PRIVATE data.
// without error handling for more clarity
loadRsp, _ := tpm2.Load{
	ParentHandle: tpm2.NamedHandle{ // reference to the parent key
		Name:   createPrimaryRsp.Name,
		Handle: createPrimaryRsp.ObjectHandle,
	},
	InPublic:  public, // TPM2B_PUBLIC
	InPrivate: private, // TPM2B_PRIVATE
}.Execute(tpm)
Once loaded, the key can be used to perform cryptographic operations, depending on its attributes.
Complete Example
To make this more concrete, this pill includes a working example that implements everything we’ve discussed so far.
The source code is available here.
It provides a CLI for creating and loading an ordinary key into a TPM.
Depending on your setup, you can run the following terminal commands:
# Create the key
# Note: the key will be stored in the current directory with the name `key.tpm`
go run github.com/loicsikidi/tpm-pills/examples/04-pill create
# output: Ordinary key created successfully 🚀

# Load the key in the TPM
go run github.com/loicsikidi/tpm-pills/examples/04-pill load --key ./key.tpm
# output: Ordinary key loaded successfully 🚀

# Clean up
# Note: the command will remove swtpm state
go run github.com/loicsikidi/tpm-pills/examples/04-pill cleanup
# output: State cleaned successfully 🚀

# remove created file
rm -f ./key.tpm
Note: by default, the example uses swtpm as a TPM simulator. If you want to use a real TPM, you can specify the
--use-real-tpmflag.
The key.tpm file is a JSON document that stores the key material returned by TPM2_Create. It contains the following fields:
outPrivate: the encrypted private portion of the key (base64-encodedTPM2B_PRIVATE)outPublic: the public portion of the key (base64-encodedTPM2B_PUBLIC)- other fields related to the creation process (base64-encoded)
This JSON format makes it convenient to persist and reload keys, while the encryption of TPM2B_PRIVATE ensures that the sensitive key material remains protected.
The output of TPM2_CreatePrimary doesn’t include a TPM2B_PRIVATE, which prevents loading it later via TPM2_Load.
This is by design: a primary key is reproducible.
Bonus
The file 04-pill/concepts_test.go includes unit tests that demonstrate key concepts from this pill, including key reproducibility and that only storage keys can have children.
Feel free to check it out if you’re curious.
Conclusion
In this pill, we introduced key concepts in TPM key management.
In summary, we covered:
- The idea of hierarchies
- The difference between primary and ordinary keys
- The reproducible nature of primary keys
- Key attributes and their purposes
Then, we applied these ideas in a practical example.
Next pill…
…we’ll use TPM keys to perform cryptographic operations.
🚧 TPM Pills is in beta 🚧
- if you encounter problems 🙏 please report them on the tpm-pills issue tracker
- if you think that
TPM Pillsshould cover a specific topic which isn’t in the roadmap, let’s initiate a discussion 💬
-
if you’re familiar with the PKCS#11 protocol, a hierarchy is similar to the concept of a
token↩ -
this refers to the OEM (Original Equipment Manufacturer) ↩
-
also referred to as the primary seed ↩
-
it may have been generated elsewhere and then imported into the TPM ↩
Perform cryptographic operations with asymmetric keys
As the title suggests, in this pill we will focus on asymmetric keys; however, note that the next pill will be dedicated to the use of symmetric keys.
A TPM is capable of performing basic cryptographic operations such as encryption/decryption and signing/verification. To use these methods, keep in mind that the key must first be loaded (i.e., TPM2_Load).
The code of the CLI that you will see below is fully available here.
Note: if you want to use a real TPM in the examples, you can add –use-real-tpm flag in each command (except cleanup).
Encryption / Decryption
Let’s begin with encryption + decryption using an asymmetric key. This function ensures data integrity and confidentiality and follows this pattern:
- The public key encrypts a payload
- The private key decrypts the payload
However, asymmetric encryption has a limitation: maximum payload size. For example, here are the constraints when using an RSA key with OAEP padding1:
| Algorithm | Parameters | Maximum message length (in bytes) |
|---|---|---|
| RSA_DECRYPT_OAEP_2048_SHA256 | k = 256; hLen = 32; | 190 |
| RSA_DECRYPT_OAEP_3072_SHA256 | k = 384; hLen = 32; | 318 |
| RSA_DECRYPT_OAEP_4096_SHA256 | k = 512; hLen = 32; | 446 |
| RSA_DECRYPT_OAEP_4096_SHA512 | k = 512; hLen = 64; | 382 |
Table: RSA OAEP maximum payload size
In short, asymmetric encryption is not recommended for variable-length messages, as some values may exceed the size limit. In such cases, hybrid cryptography2 is preferred.
Now that this is clarified, let’s look at a practical example! First, we’ll create a key with the following attributes:
| sign | decrypt | restricted |
|---|---|---|
| 0 | 1 | 0 |
To do so, run the command below:
# Note: the key will be stored in the current directory
# with the names `key.tpm` and `public.pem`
go run github.com/loicsikidi/tpm-pills/examples/05-pill create --type decrypt
# output: Ordinary key created successfully 🚀
Exceptionally this key is of type RSA because the command TPM2_ECC_Decrypt3 was introduced in a recent version of the spec (i.e., 1.83), and very few TPMs currently comply with it.
Typically, a TPM version can be updated via a BIOS firmware upgrade.
Now, let’s encrypt a message using the public key:
# Encrypt a blob using the public key
go run github.com/loicsikidi/tpm-pills/examples/05-pill encrypt --pubkey ./public.pem \
--message 'Hello TPM Pills!' --output ./blob.enc
# output: Encrypted message saved to ./blob.enc 🚀

# Alternatively, you can use the `openssl` command to encrypt the blob
openssl pkeyutl -encrypt -in <(echo -n 'Hello TPM Pills!') -out ./blob.enc \
-pubin -inkey public.pem -pkeyopt rsa_padding_mode:oaep -pkeyopt rsa_oaep_md:sha256
We are using OAEP padding with SHA256 hashing. It’s an arbitrary choice.
Technically, a TPM is not required for encryption; however, in constrained environments (e.g., IoT or embedded systems), the TPM2_RSA_Encrypt command can be used.
All prerequisites are now met to decrypt:
# Decrypt the blob using the private key held in the TPM
go run github.com/loicsikidi/tpm-pills/examples/05-pill decrypt --key ./key.tpm \
--in ./blob.enc
# output: Decrypted "Hello TPM Pills!" successfully 🚀

# clean up
go run github.com/loicsikidi/tpm-pills/examples/05-pill cleanup
rm -f ./key.tpm ./public.pem ./blob.enc
Under the hood, the command looks like this:
decryptRsp, _ := tpm2.RSADecrypt{
    KeyHandle: tpm2.NamedHandle{ // reference to the key doing the job
        Handle: loadedOrdinaryKey.ObjectHandle,
        Name:   loadedOrdinaryKey.Name,
    },
    CipherText: tpm2.TPM2BPublicKeyRSA{Buffer: ciphertext}, // encrypted blob
    InScheme: tpm2.TPMTRSADecrypt{
        Scheme: tpm2.TPMAlgOAEP, // algorithm
        Details: tpm2.NewTPMUAsymScheme(
            tpm2.TPMAlgOAEP,
            &tpm2.TPMSEncSchemeOAEP{
                HashAlg: tpm2.TPMAlgSHA256, // hash algorithm
            },
        ),
    },
}.Execute(tpm)
fmt.Println(decryptRsp.Message.Buffer) // original message in plain text
Signature
Now, let’s see how to perform a digital signature using a TPM.
This time the flow is reversed: the private key signs, and the public key verifies the integrity.
First, let’s create a signing key:
go run github.com/loicsikidi/tpm-pills/examples/05-pill create --type signer
# output: Ordinary key created successfully 🚀
This key has the following attributes:
| sign | decrypt | restricted |
|---|---|---|
| 1 | 0 | 0 |
Run the following commands to create and verify a message signature:
go run github.com/loicsikidi/tpm-pills/examples/05-pill sign --key ./key.tpm \
--message 'Hello TPM Pills!' --output ./message.sig
# output: Signature saved to ./message.sig 🚀

go run github.com/loicsikidi/tpm-pills/examples/05-pill verify --pubkey ./public.pem \
--signature ./message.sig --message 'Hello TPM Pills!'
# output: Signature verified successfully 🚀

# Alternatively, you can use the `openssl` command to verify the signature
openssl dgst -sha256 -verify ./public.pem -signature ./message.sig <(echo -n 'Hello TPM Pills!')
# output: Verified OK

# clean up
go run github.com/loicsikidi/tpm-pills/examples/05-pill cleanup
rm -f ./key.tpm ./public.pem ./message.sig
As before, the TPM provides a command for signature verification (i.e., TPM2_VerifySignature4).
In code, the TPM_Sign command looks like this:
signRsp, _ := tpm2.Sign{
    KeyHandle: tpm2.NamedHandle{ // reference to the key doing the job
        Handle: loadedOrdinaryKey.ObjectHandle,
        Name:   loadedOrdinaryKey.Name,
    },
    Digest:     digest, // payload's digest
}.Execute(tpm)
Deep dive: signing with a restricted key
In the previous pill, we introduced the concept of a restricted key. To recap, this property allows a key to sign or encrypt/decrypt TPM-internal objects. Now the question arises: is it possible to sign external data with a restricted key? The answer is yes, but under certain conditions.
A restricted signing key is mainly used to produce attestations in the TPMS_ATTEST5 format.
It’s a proof generated by a TPM and intended for a third party. The attestation typically relates to some internal TPM state. This document is always signed by a restricted signing key, commonly known as an Attestation Key.
In a simplified view, a TPMS_ATTEST structure looks like this:
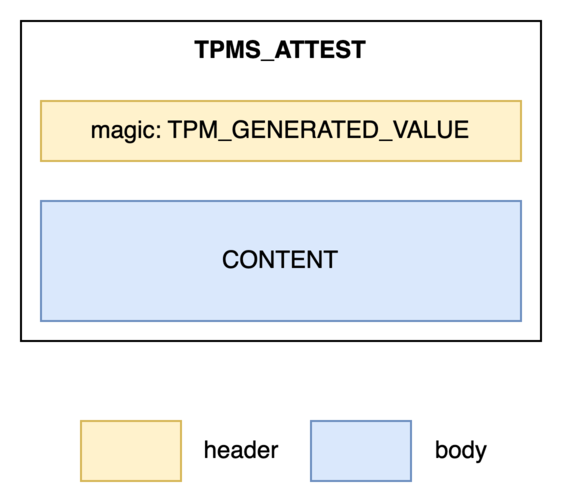
You’ll notice the structure includes a header (TPM_GENERATED_VALUE), which is critical — it indicates that the data within the attestation (i.e., the body) originates from a TPM. In our case, though, the data does not come from a TPM — but don’t worry, the spec takes this situation into account. The signature is accepted only if the TPM produced the digest itself using TPM2_Hash. Let’s break this down using the diagram below:
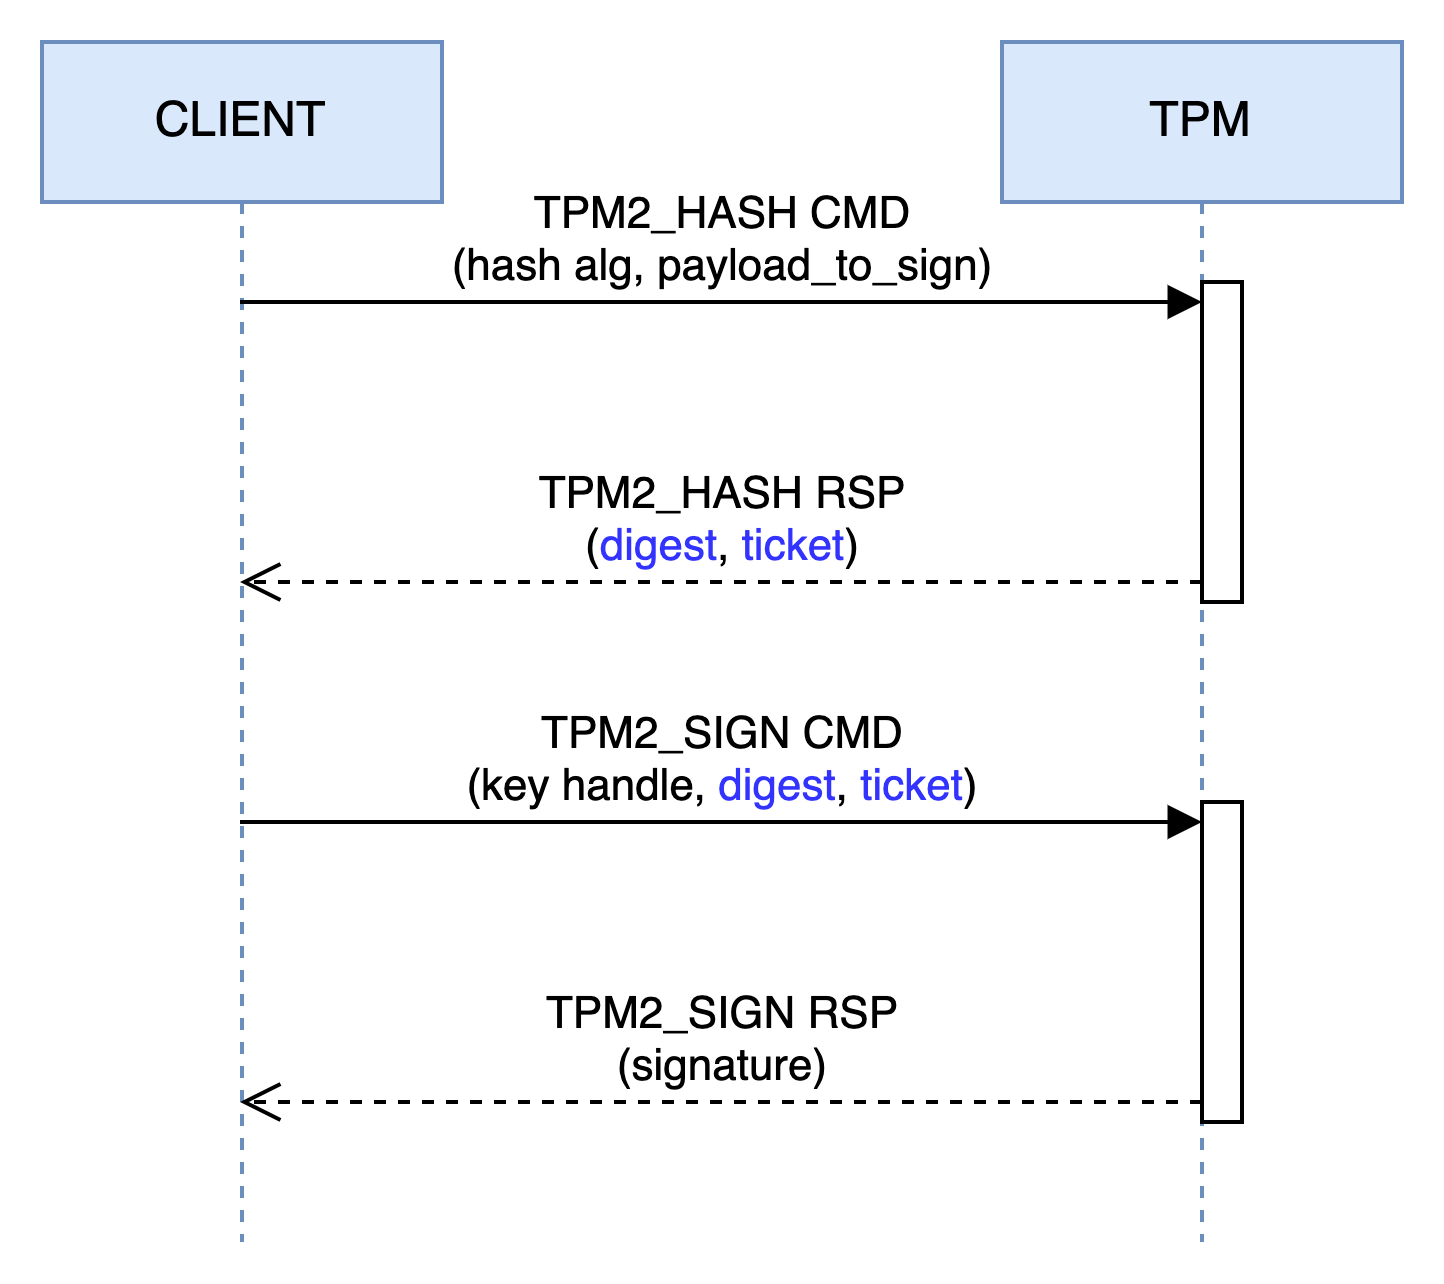
As shown, the TPM2_Hash6 command returns two elements: a digest and a ticket. The first is straightforward — but what is a ticket? Think of the TPM as a stateless component. Like an HTTP cookie, a ticket carries information between TPM commands. In our case, the ticket tells TPM_Sign that the TPM itself produced the digest.
The ticket is a signed document created by the TPM using an internal, non-exportable HMAC key. When a command supports tickets, the TPM first verifies the signature before proceeding.
Here’s the equivalent in code:
// without error handling for more clarity
rspHash, _ := tpm2.Hash{ // hash performed by the TPM
    Data:      tpm2.TPM2BMaxBuffer{Buffer: []byte(message)},
    HashAlg:   tpm2.TPMAlgSHA256,
    Hierarchy: tpm2.TPMRHOwner,
}.Execute(tpm)

signRsp, _ := tpm2.Sign{
    KeyHandle: tpm2.NamedHandle{ // reference to the key doing the job
        Handle: loadedOrdinaryKey.ObjectHandle,
        Name:   loadedOrdinaryKey.Name,
    },
    Digest:     rspHash.OutHash, // digest
    Validation: rspHash.Validation, // ticket
}.Execute(tpm)
As a demonstration, here’s the same example as earlier, but this time using a restricted key:
| sign | decrypt | restricted |
|---|---|---|
| 1 | 0 | 1 |
go run github.com/loicsikidi/tpm-pills/examples/05-pill create --type restricted-signer

# Sign a message using the private key held in the TPM
go run github.com/loicsikidi/tpm-pills/examples/05-pill sign --key ./key.tpm \
--message 'Hello TPM Pills!' --output ./message.sig
# output: Signature saved to ./message.sig 🚀

# Verify the signature using the public key
go run github.com/loicsikidi/tpm-pills/examples/05-pill verify --pubkey ./public.pem \
--signature ./message.sig --message 'Hello TPM Pills!'
# output: Signature verified successfully 🚀

# Alternatively, you can use the `openssl` command to verify the signature
openssl dgst -sha256 -verify ./public.pem -signature ./message.sig <(echo -n 'Hello TPM Pills!')
# output: Verified OK

# Clean up
go run github.com/loicsikidi/tpm-pills/examples/05-pill cleanup
rm -f ./key.tpm ./public.pem ./message.sig
Conclusion
In this pill, we explored how to perform cryptographic operations with an asymmetric key pair (encryption/decryption, signing/verification). We haven’t covered every function (e.g., Elliptic Curve Diffie-Hellman, ECDH), but we’ve tackled the essentials. We also took a detour to introduce two key concepts: attestation and ticket.
Next Pill…
…we will focus on symmetric keys and how to use them.
🚧 TPM Pills is in beta 🚧
- if you encounter problems 🙏 please report them on the tpm-pills issue tracker
- if you think that
TPM Pillsshould cover a specific topic which isn’t in the roadmap, let’s initiate a discussion
-
see Optimal asymmetric encryption padding article on Wikipedia ↩
-
see hybrid cryptosystem article on Wikipedia ↩
-
https://trustedcomputinggroup.org/wp-content/uploads/Trusted-Platform-Module-2.0-Library-Part-3-Version-184_pub.pdf#page=110 ↩
-
https://trustedcomputinggroup.org/wp-content/uploads/Trusted-Platform-Module-2.0-Library-Part-3-Version-184_pub.pdf#page=165 ↩
-
https://trustedcomputinggroup.org/wp-content/uploads/Trusted-Platform-Module-2.0-Library-Part-2-Version-184_pub.pdf#page=158 ↩
-
security note: if the payload to be hashed includes the
TPM_GENERATED_VALUEheader, the command will not return a ticket. ↩
Perform cryptographic operations with symmetric keys
After introducing asymmetric keys in the previous pill, it’s time to move on to symmetric keys.
Like asymmetric keys, symmetric keys can be used to perform encryption/decryption or signature operations. These two types of operations allow us to address a number of use cases, the most well-known being probably the encryption function that enables Bitlocker (on Windows) and systemd (on Linux) to work.
During an onboarding phase, a secret (aka symmetric key) is produced to encrypt and decrypt the disk with a good security/speed ratio. However, a question remains: how to securely store this secret at rest? The TPM is the component (co-located on the machine) that carries this responsibility. Subsequently, during the early boot, the encrypted (sealed) secret is provided to the TPM which returns the plaintext value.
Now, let’s take a closer look at how things work through a series of small examples!
The code of the CLI that you will see below is fully available here.
Note: if you want to use a real TPM in the examples, you can add –use-real-tpm flag in each command (except cleanup).
Encryption / Decryption vs. Seal / Unseal
It is necessary to distinguish between encryption and sealing. In one case we will use a key to perform cryptographic operations (e.g. AES or SM4), in the other we will want to protect a secret generally produced outside the TPM.
Encryption / Decryption
Most TPMs do not support symmetric encryption as indicated in the spec below:
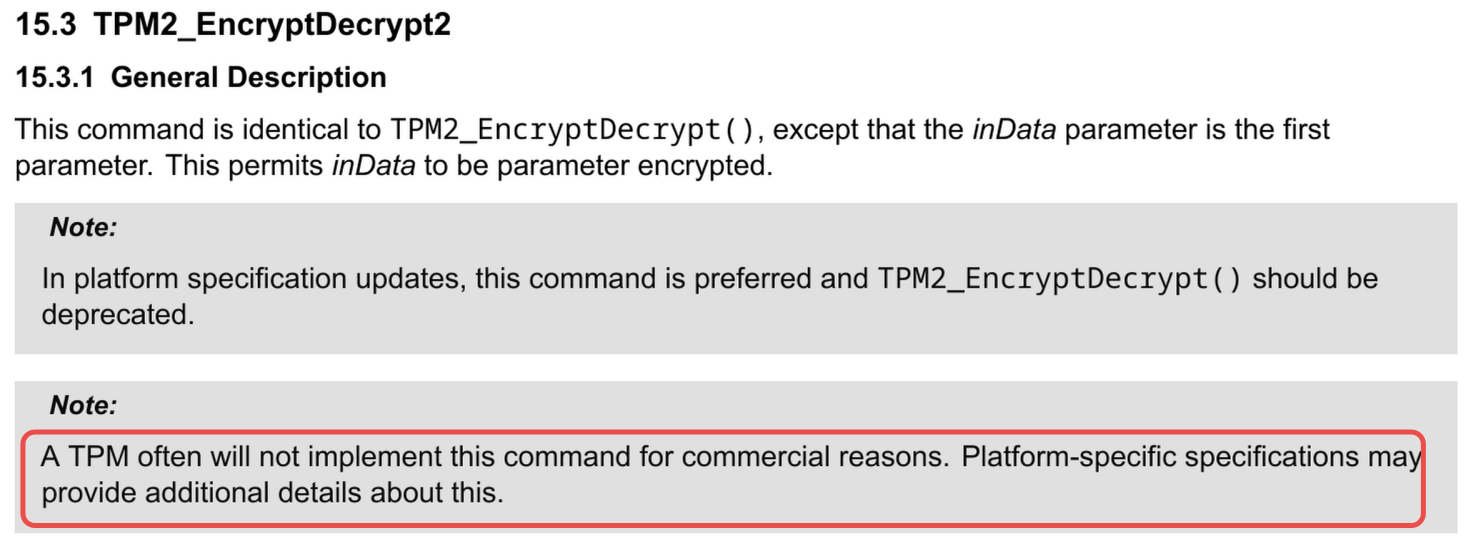
For example, my machine’s TPM does not support this function.
If you are on Linux, you can check support by running the following command:
tpm2_getcap commands | grep -i encryptdecryptLet’s start by creating a symmetric key with the following characteristics:
| sign | decrypt | restricted |
|---|---|---|
| 0 | 1 | 0 |
Table: Key attributes
# Note: the key will be stored in the current directory
# with the name `key.tpm`
go run github.com/loicsikidi/tpm-pills/examples/06-pill create
# output: Ordinary key created successfully 🚀
The key is AES 128-bit type and the encryption mode is CFB (Cipher Feedback).
Why this mode?
Although far from current standards (e.g. lack of data authentication), it benefits from wide support.
Now, we can perform encryption / decryption:
go run github.com/loicsikidi/tpm-pills/examples/06-pill encrypt --message "Hello TPM Pills!" --output ./blob.enc
# output: Encrypted message saved to ./blob.enc 🚀

go run github.com/loicsikidi/tpm-pills/examples/06-pill decrypt --key ./key.tpm \
--in ./blob.enc
# output: Decrypted "Hello TPM Pills!" successfully 🚀

# clean up
go run github.com/loicsikidi/tpm-pills/examples/06-pill cleanup
rm -f ./key.tpm ./blob.enc
Under the hood, the CLI uses the TPM2_EncryptDecrypt2 command (which is the successor of TPM2_EncryptDecrypt as it adds a security element1)
rsp, _ := tpm2.EncryptDecrypt2{
	KeyHandle: keyHandle, // reference to the key doing the job

	// if the payload is bigger than TPM's buffer
	// we can use pagination ⬇️
	Message: tpm2.TPM2BMaxBuffer{
		Buffer: block,
	},
	Mode:    mode, // eg. CFB, GCM, etc.
	Decrypt: decrypt, // this is a boolean
	IV: tpm2.TPM2BIV{
		Buffer: iv,
	},
}.Execute(tpm)
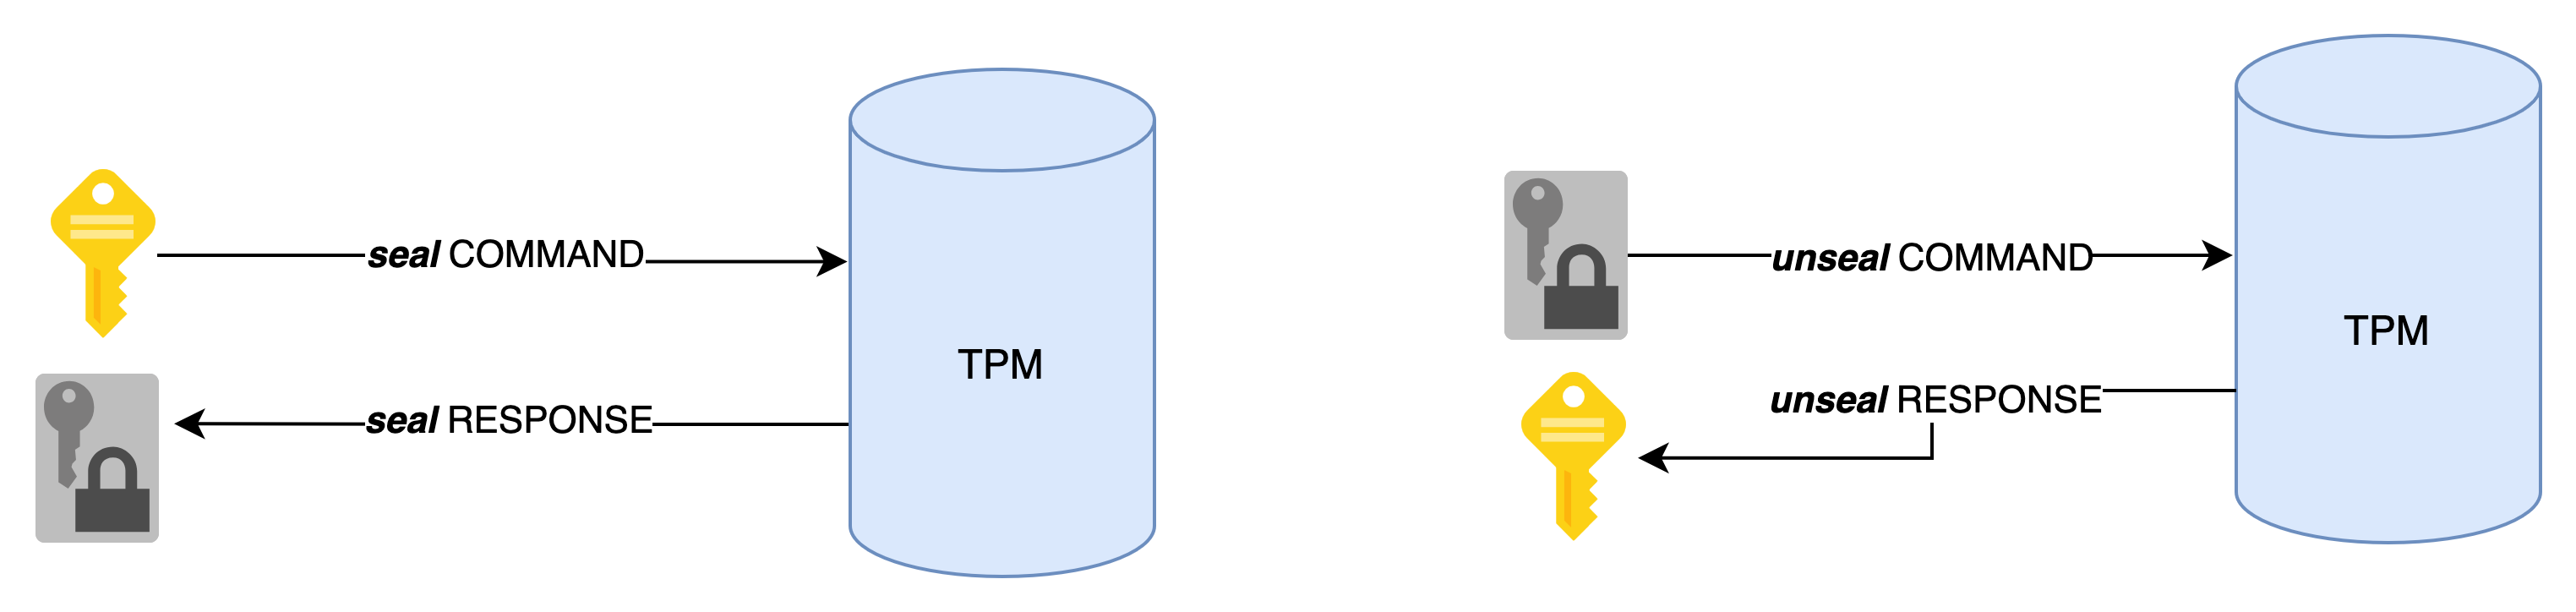
Seal / Unseal
Since support for TPM2_EncryptDecrypt and TPM2_EncryptDecrypt2 is not widespread, you will mostly use sealing to encrypt secrets at rest.
$IMAGE
To do this, you have two steps:
- the seal:
TPM2_CreatePrimaryorTPM2_Create - the unseal:
TPM2_Unseal
In the implementations I’ve most often seen TPM2_Create command used for sealing under a Storage Key2.
Data to seal is nothing more and nothing less than a key with the following properties:
| sign | decrypt | restricted |
|---|---|---|
| 0 | 0 | 0 |
Table: Sealed data key attributes
In short, a key that technically can do nothing except return its content via the TPM2_Unseal command.
Let’s see what it looks like in code:
# SEAL
createRsp, _ := tpm2.Create{
ParentHandle: parentHandle,
InPublic: tpm2.New2B(tpm2.TPMTPublic{
Type: tpm2.TPMAlgKeyedHash, // indicates that it's a shared secret
NameAlg: tpm2.TPMAlgSHA256,
ObjectAttributes: tpm2.TPMAObject{
FixedTPM: true,
FixedParent: true,
UserWithAuth: true,
SensitiveDataOrigin: false, // necessary because the value has been generated outside the TPM
SignEncrypt: false,
Decrypt: false,
Restricted: false,
},
}),
InSensitive: TPM2BSensitiveCreate{
Sensitive: &TPMSSensitiveCreate{
Data: NewTPMUSensitiveCreate(&TPM2BSensitiveData{
Buffer: []byte("VALUE TO SEAL"), // data blob
}),
},
},
}.Execute(tpm)
# UNSEAL
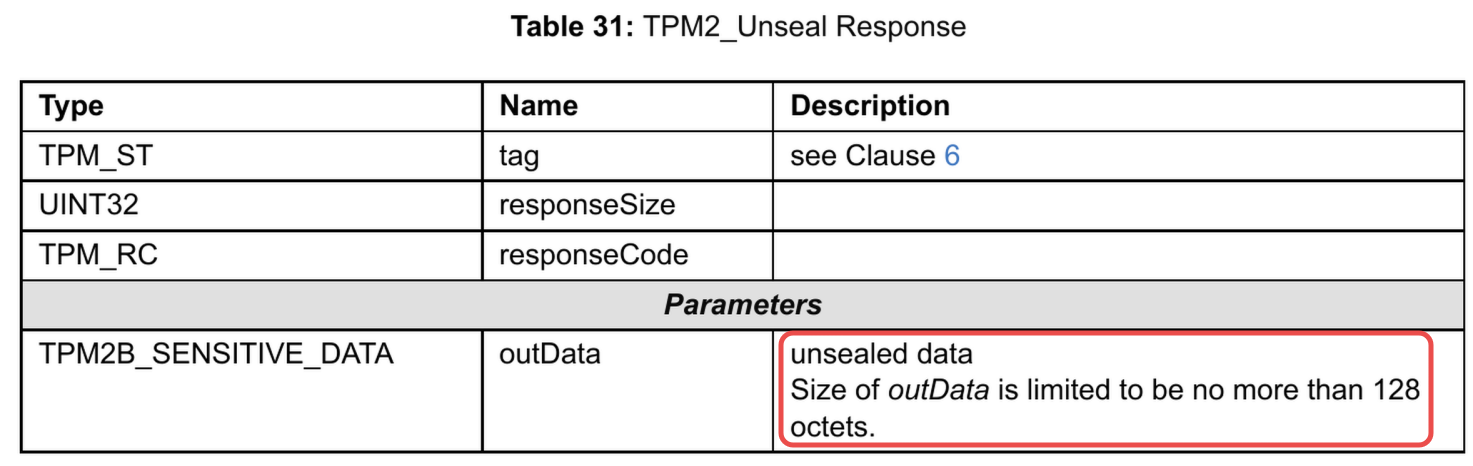
unsealRsp, _ := tpm2.Unseal{
ItemHandle: keyHandle, // key to unseal's handle
}.Execute(thetpm)
As we can see above, the seal consists of creating a symmetric key by providing it with the value. The TPM via the Primary Seed (i.e. TPM2_CreatePrimary) or the Storage Parent (i.e. TPM2_Create) is able to encrypt the key’s content to store it securely.
The spec limits the secret size to 128 bytes so keep that in mind!
Please find below a concrete example using the CLI:
go run github.com/loicsikidi/tpm-pills/examples/06-pill seal \
--message "important secret" --output ./sealed_key.tpm
# output: Sealed message saved to ./sealed_key.tpm 🚀

go run github.com/loicsikidi/tpm-pills/examples/06-pill unseal --in ./sealed_key.tpm
# output: Unsealed message: "important secret" 🚀

# clean up
go run github.com/loicsikidi/tpm-pills/examples/06-pill cleanup
rm -f ./sealed_key.tpm
Signature
Here, HMAC3 is used to sign messages, most often for authentication purposes. For example, the S3 authentication protocol relies on this principle (i.e. AWS Signature v4) by sharing a shared secret with the client.
Whenever possible, try to base authentication on ephemeral identities through Identity Federation4 rather than long-term secrets even when stored in a TPM.
For this use case, this pill will not provide an example, however, here are two repos that show how to implement this in Go:
Deep dive: derives key (KDF)
In addition to signing, the HMAC function provides a quite interesting property, that of being able to derive other symmetric keys from a master key.
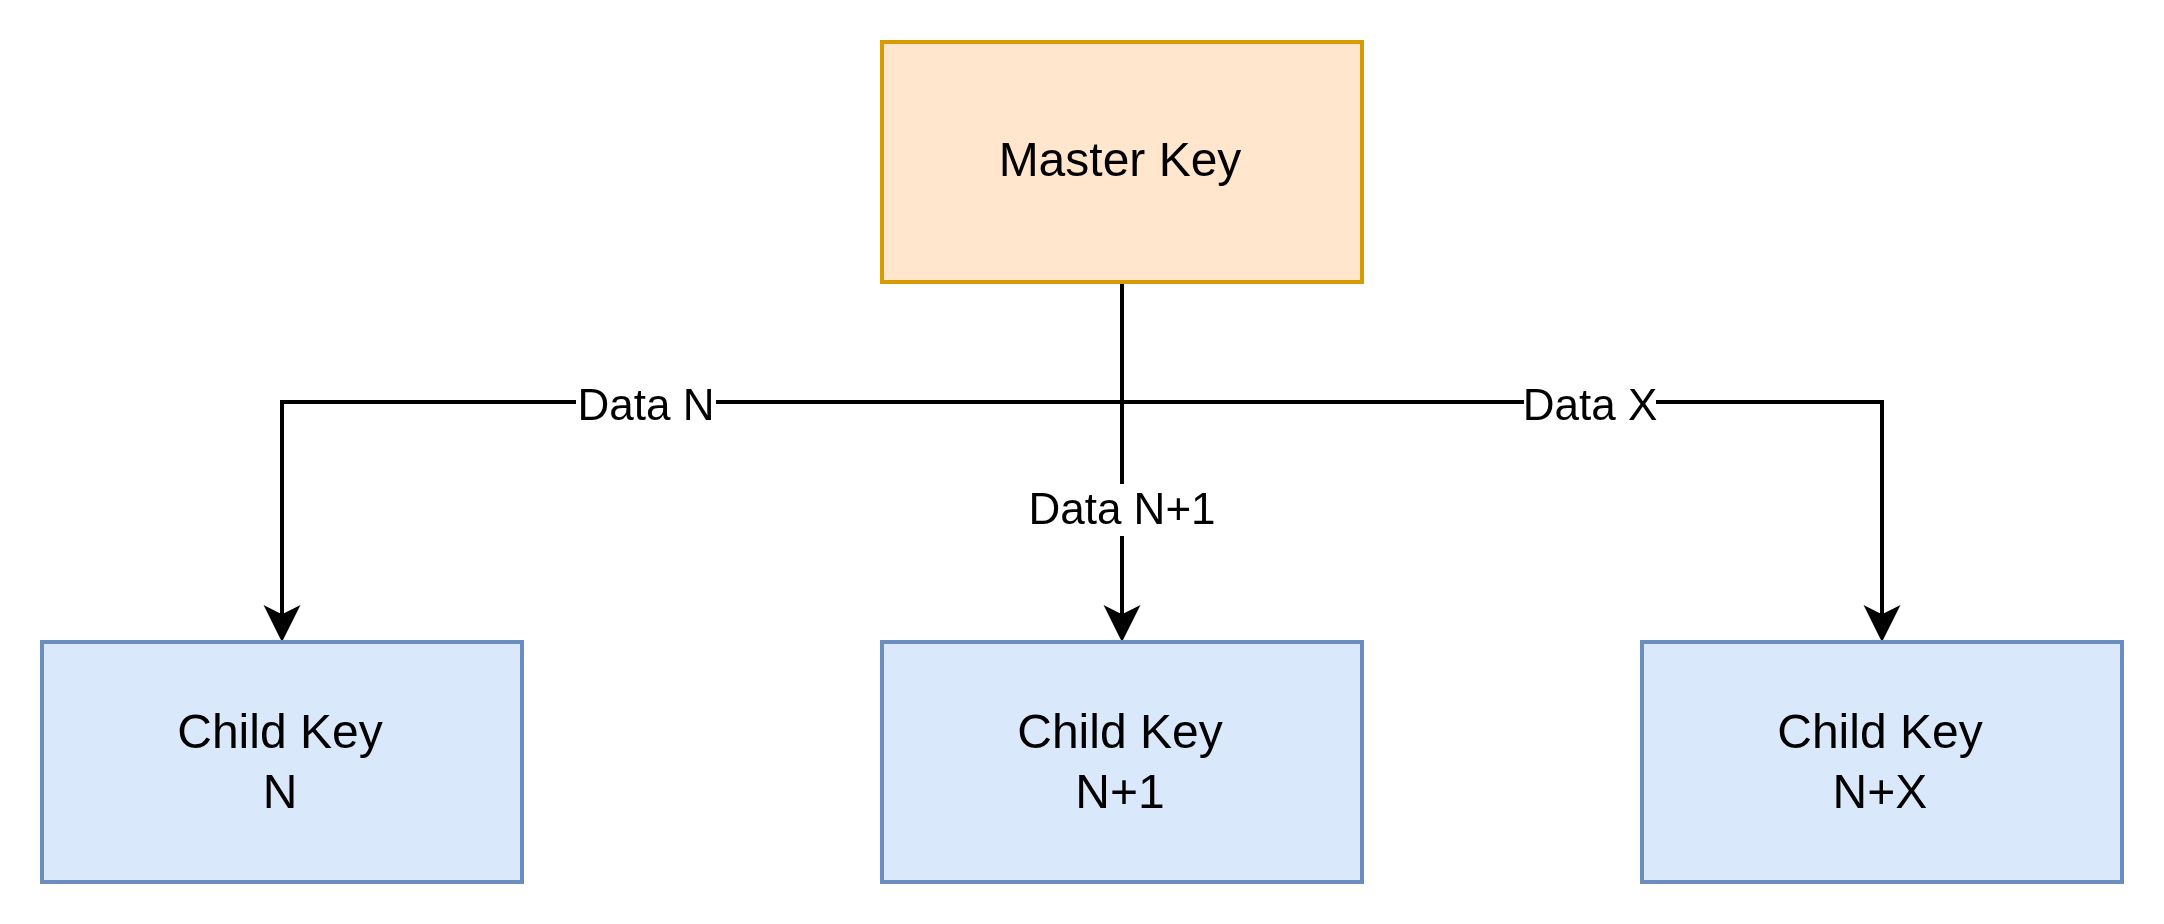
The idea is quite elegant in that:
- the master key is stored in a secure environment (i.e. TPM)
- the TPM is autonomous to generate the HMAC
The HMAC plays the role of Pseudorandom Function (PRF) to produce a seed that will be used by a Key Derivation Function (KDF) to generate a key with good entropy.
It’s a deterministic function that:
- Takes two inputs:
- A secret key K (master key)
- Some arbitrary data M (message/data)
- Produces an output:
- A pseudorandom output of fixed length
- Indistinguishable from a truly random function for an attacker who doesn't know K
- Essential properties:
- Deterministic: PRF(K, M) always produces the same result
- Pseudorandom: Without knowing K, the output appears random
- One-way: Impossible to recover K or M from the output
- Collision resistant: Difficult to find M₁ ≠ M₂ such that PRF(K,M₁) = PRF(K,M₂)
Here’s how this applies in a TPM context:
K: is an HMAC type key that is loaded in the TPM (key handle in the diagram below)M: is the data to be signed (data in the diagram below)
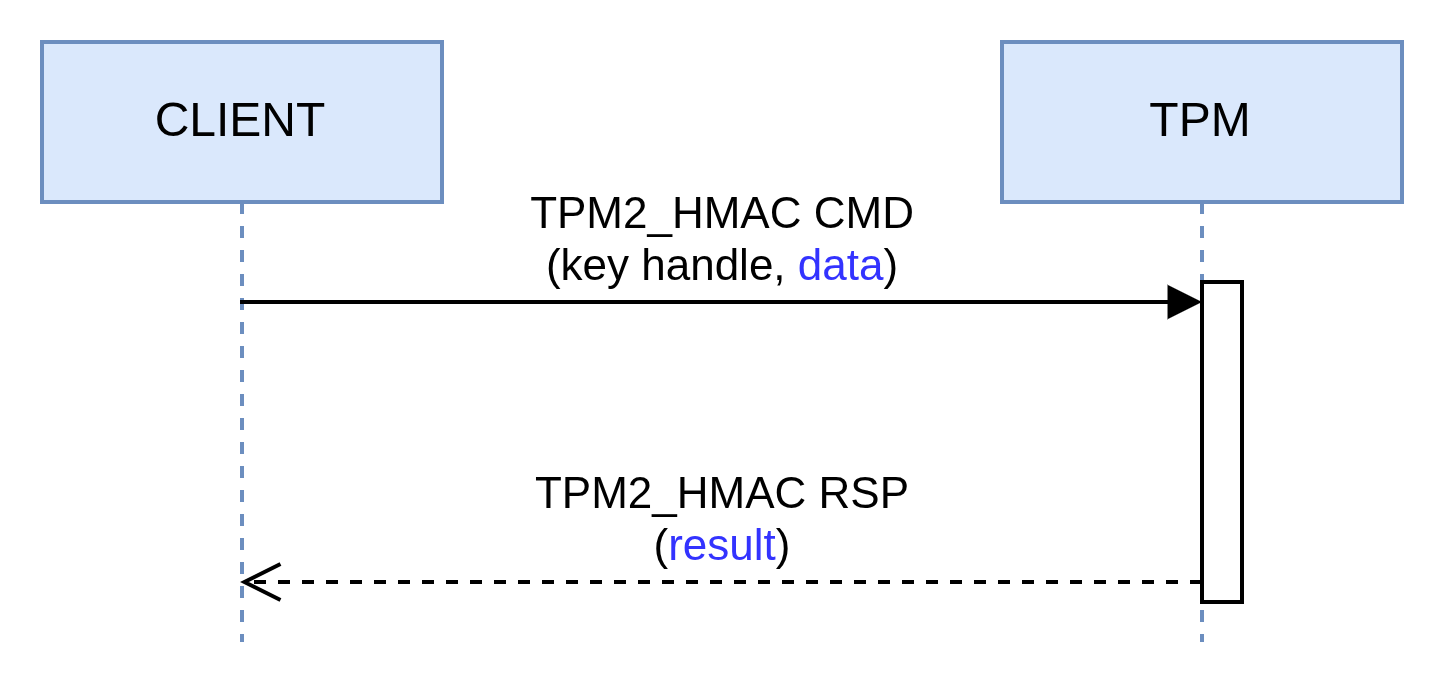
The example below shows how to generate an HMAC with a digest produced with SHA-256:
go run github.com/loicsikidi/tpm-pills/examples/06-pill hmac --data "secret"
# output: HMAC result: "bde701bc281f6d5e55ee29b30c08c59fb05425298442b5060238af88305964a0" 🚀

# value is deterministic
go run github.com/loicsikidi/tpm-pills/examples/06-pill hmac --data "secret"
# output: HMAC result: "bde701bc281f6d5e55ee29b30c08c59fb05425298442b5060238af88305964a0" 🚀

# clean up
go run github.com/loicsikidi/tpm-pills/examples/06-pill cleanup
Note: the output is formatted in hexadecimal for clarity but this doubles the payload size. Originally it is 32 bytes, in hex it is therefore 64 bytes.
The key that was produced has the following characteristics this time:
| sign | decrypt | restricted |
|---|---|---|
| 1 | 0 | 0 |
Table: HMAC key attributes
Since HMAC is a signature protocol, this is indeed a prerequisite.
The size of the seed varies depending on the hash function.
| Hash Algo | HMAC Length (in bytes) |
|---|---|
SHA-256 | 32 |
SHA-384 | 48 |
SHA-512 | 64 |
Table: HMAC length by hash algorithm
If you’re interested in the subject, I recommend taking a look at the tpm-kdf repo which provides a KDF implementation based on Counter Mode. In parallel, I also recommend reading NIST SP 800-108 for all the security information.
Acknowledgement
You probably noticed that this pill mentions several repos belonging to salrashid123 who is a person whose contributions on TPM usage are invaluable.
Make sure to check out his work!
Bonus
The file 06-pill/concepts_test.go includes unit tests demonstrating some concepts that were discussed in this pill (e.g. maximum seal size, HMAC sizes, etc.)
Conclusion
In this pill, we introduced different use cases for symmetric keys. The key takeaways are as follows:
- support for symmetric encryption is very limited
- seal/unseal turns out to be the alternative
- HMAC is the first-class citizen algorithm for signing
Nevertheless, some might say “that’s nice and all, but where is the authorization layer?”. A little patience, this topic will be addressed as soon as the main concepts are mastered, but know that it is possible to set up more or less complex locks. For example, it is possible to:
- ask the user to provide a passphrase to authorize unsealing
- limit the unseal operation only during boot (not after in user-space)
- authorize unsealing if and only if the machine is in a trusted state at boot time (cf. measured boot)
Next Pill…
…we will focus on the two elements that allow referencing a key (the handle and the name) in a TPM.
🚧 TPM Pills is in beta 🚧
- if you encounter problems 🙏 please report them on the tpm-pills issue tracker
- if you think that
TPM Pillsshould cover a specific topic which isn’t in the roadmap, let’s initiate a discussion
-
TPM2_EncryptDecrypt2adds the ability to encrypt in transit the content of the data to be encrypted or decrypted. ↩ -
see the Wikipedia page ↩
-
I’m referring in particular to
GCP Workload Identity,AWS STSorAD federated identity credentials↩
Name and Handle: a way to identify a key
Now that we have a good understanding of the different key types and their usage, let’s focus on the concepts of name and handle.
Name
Let’s start by discussing the name. Simply put, the name is a key’s unique identifier (its fingerprint). The spec states that the name is the result of the following function: \( name = nameAlg || Hash(nameAlg, publicArea) \).
In short, it is nothing more than the concatenation of a prefix (the hash algorithm that was used) and a hash.
What is the publicArea1?
It is a payload carrying public metadata about a key stored in a TPM (i.e. TPMT_PUBLIC). It is important to note that both symmetric and asymmetric keys have a publicArea.
Please find below the different fields associated with the publicArea:
| Parameter | Description |
|---|---|
| type | algorithm associated with the key (e.g. RSA, ECC, etc.) |
| nameAlg | algorithm used for computing the Name of the object (e.g. SHA256, etc.) |
| objectAttributes | attributes that, along with type, determine the manipulations of this object |
| authPolicy | optional policy for using this key |
| parameters | the algorithm or structure details |
| unique | the unique identifier of the structure. For an asymmetric key, this would be the public key |
Table: publicArea fields
Source: section 12.2.4, Part 2, v184 TPM 2.0
The important thing here is not to understand the purpose of each field but rather to keep in mind:
- that these fields are expected when creating a key
- that once created, these fields are no longer modifiable
Is the name predictable?
Not really, because when the TPM generates the private key, the client cannot know its value in advance. The client relies entirely on the TPM, and it is no surprise that the TPM2_CreatePrimary and TPM2_Create commands return the key’s name in their response.
Typically, the name is the ideal data to store in an inventory to identify a key because it is a static value.
Handle
Now, let’s discuss the notion of handle. A TPM can be seen as a heap 2 into which objects are loaded for interaction. As such, each key is associated with a memory area called a handle.
The TPM is capable of loading other types of resources but this is of little importance for now. If the topic interests you, TCG defines the addressing of objects based on their type in this document.
When created, a key is necessarily associated with a transient handle, meaning an ephemeral memory area. Indeed, if the machine reboots, the object will no longer be accessible. In practice, this is not a problem because, just like in the examples from previous pills, we can store the key on disk (i.e. TPM2B_PUBLIC/PRIVATE) and reload it later via the TPM2_Load command.
The TCG spec nevertheless provides an alternative, through another memory area called persistent handle. As its name suggests, this part of the TPM persists keys 3 (despite reboots) and is relevant when you want to avoid storing a key outside the TPM.
Please find below a representation of the two handle families:
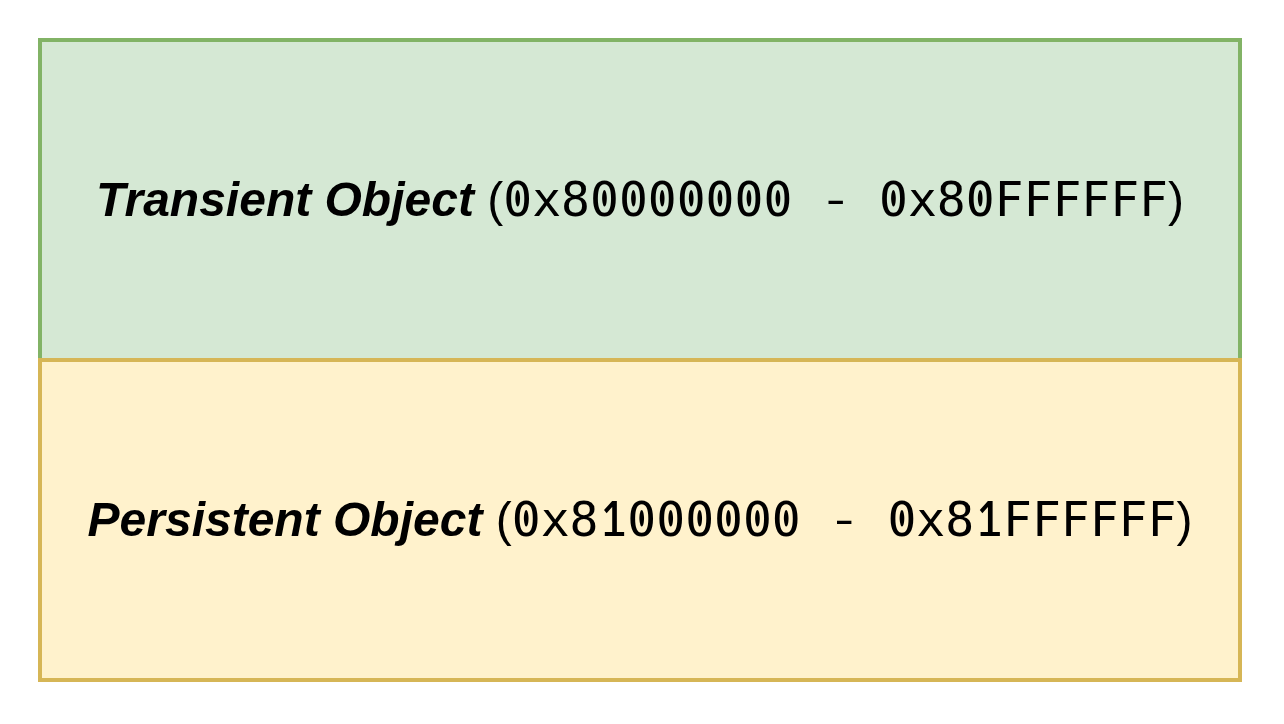
Note: The diagram shows the address range.
How does it work?
As mentioned in the preamble, a key that is created (i.e. TPM2_Create or TPM2_CreatePrimary) or loaded (i.e. TPM2_Load) into a TPM is necessarily associated with a transient handle. The TPM2_EvictControl 4 command allows persisting a key.
TPM2_EvictControl also allows removing an already persisted object, if you need to get rid of it.
Once persisted, you must use the TPM2_ReadPublic5 command instead of TPM2_Load to load a key into the TPM in order to use it.
Note: both a primary key and an ordinary key (see pill#4 for a definition) can be persisted.
Deep dive: Name + Handle = extra protection
Now, let’s spend some time looking at how the TPM uses these two concepts to improve security.
A key can be reduced to the diagram below:

- a memory address (i.e. handle)
- a unique identifier (i.e. name)
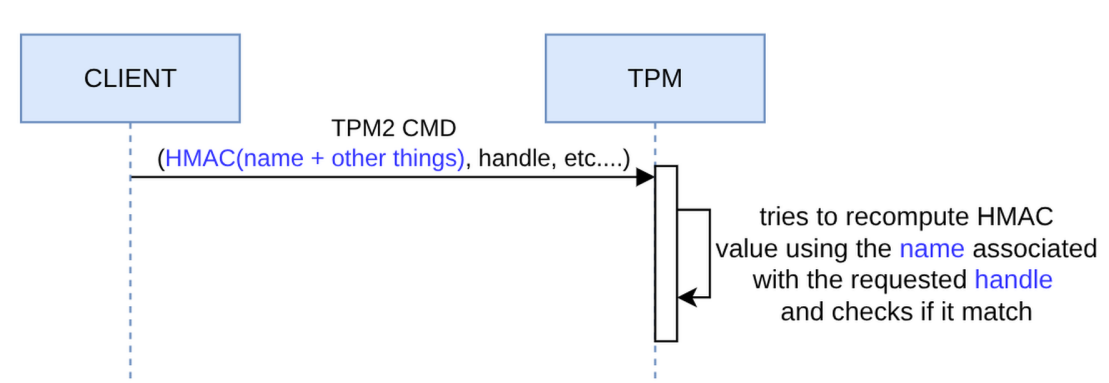
To secure communication on the bus, the TPM allows setting up a session between the client (e.g. TPM library) and the TPM. This session enables, among other things, an integrity mechanism based on signatures. Indeed, it is possible to add a signature to a command and to a response so that the entity receiving the payload can verify its integrity and ensure that the data has not been altered during transit.
To do so, the command or response includes an HMAC (i.e. signature) that represents the object in transit. In the case of a command involving one or more keys, the name is an element of the signature. When the TPM receives the command, it loads the keys from the specified handles and computes the name to reproduce the HMAC. If the HMAC is verified, we have assurance of the authenticity of the name/handle pair binding and that we are not victims of a substitution attack.
The diagram below visually expresses what has just been discussed:
A practical example
Now that we’ve covered the main ideas, let’s get hands-on!
- Persist a key
- Load a persisted key
Persist a Key
As discussed in the previous section, to persist a key, you need to use the TPM2_EvictControl command:
evictControlCmd := tpm2.EvictControl{
	Auth: tpm2.TPMRHOwner, // indicates the hierarchy (may require authentication)
	ObjectHandle: &tpm2.NamedHandle{ // reference to the key to persist
		Handle: createKeyRsp.ObjectHandle,
		Name:   createKeyRsp.Name,
	},
	PersistentHandle: 0x81000010, // location where the key will be stored
}
evictControlRsp, _ := evictControlCmd.Execute(tpm)
To remove the key, you need to replay the TPM2_EvictControl command (I know, it’s counter-intuitive).
Load a Persisted Key
Then, the TPM2_ReadPublic command allows loading the key using its handle so it can be used:
readPubCmd := tpm2.ReadPublic{
	ObjectHandle: tpm2.TPMHandle(0x81000010), // location where the key is stored
}
readPubRsp, _ := readPubCmd.Execute(tpm)
Complete Example
To make this more concrete, this pill includes a working example that implements everything we’ve discussed so far.
The source code is available here.
Note: if you want to use a real TPM in the examples, you can add --use-real-tpm flag in each command (except cleanup).
# Create an ECC key, persist it at the given handle
# and write its public key (in PEM format) to the filesystem
go run github.com/loicsikidi/tpm-pills/examples/07-pill persist --handle 0x81000010
# output:
# Key persisted at handle 0x81000010
# Public key saved to /path/to/public.pem 🚀


# Load the key at the given handle and check if it matches the public key stored
# on the filesystem
go run github.com/loicsikidi/tpm-pills/examples/07-pill read --handle 0x81000010 \
--pubkey public.pem
# output: Persisted key at handle 0x81000010 matches the provided public key ✅

# Remove the key from the persisted handle
go run github.com/loicsikidi/tpm-pills/examples/07-pill unpersist --handle 0x81000010
# output: Key at handle 0x81000010 has been removed

# Ensure that the key has been removed as expected
go run github.com/loicsikidi/tpm-pills/examples/07-pill read --pubkey public.pem \
--handle 0x81000010
# output:
# error reading persisted key: failed to get persisted key handle: handle not
# found at address 0x81000010: TPM_RC_HANDLE (handle 1): the handle is not
# correct for the use

# Clean up
# Note: the command will remove swtpm state
go run github.com/loicsikidi/tpm-pills/examples/07-pill cleanup
# output: State cleaned successfully 🚀

# remove created file
rm -f ./public.pem
Bonus
The file 07-pill/concepts_test.go includes unit tests demonstrating some concepts that were discussed in this pill (e.g. name computation, session signature, create & createPrimary produce a key bound to a transient handle).
Conclusion
In this pill, we introduced the concept of handle, which allowed us to see that the TPM provides two memory areas, the first volatile and the second persistent. Furthermore, we saw that the name is a key’s fingerprint and that, as such, this information is used internally by the TPM to secure exchanges (i.e. signature) or externally by an application to get a unique identifier for the key.
Next Pill…
…we will focus on 4 types of keys that you MUST know about in order to effectively use a TPM.
🚧 TPM Pills is in beta 🚧
- if you encounter problems 🙏 please report them on the tpm-pills issue tracker
- if you think that
TPM Pillsshould cover a specific topic which isn’t in the roadmap, let’s initiate a discussion 💬
-
https://trustedcomputinggroup.org/wp-content/uploads/Trusted-Platform-Module-2.0-Library-Part-2-Version-184_pub.pdf#page=186 ↩
-
memory area ↩
-
and other types of objects ↩
-
https://trustedcomputinggroup.org/wp-content/uploads/Trusted-Platform-Module-2.0-Library-Part-3-Version-184_pub.pdf#page=299 ↩
-
https://trustedcomputinggroup.org/wp-content/uploads/Trusted-Platform-Module-2.0-Library-Part-3-Version-184_pub.pdf#page=74 ↩